PDF Just Landed in Your Folder? Brand It with HTML Headers in Zapier
PDFs with plain pages—reports, invoices, contracts—often need consistent branding: your logo, document metadata, page numbers, or legal footers. Doing that by hand for every file doesn't scale.
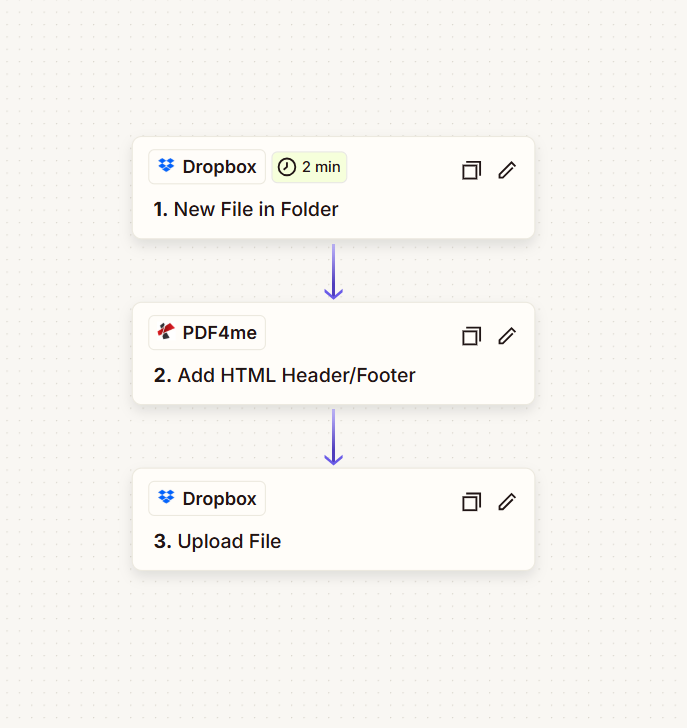
Here's the approach: A Zapier Zap in three steps: New File in Folder (trigger) → Add HTML Header/Footer (PDF4me) → Upload File. When a new PDF lands in your folder, Zapier sends it to PDF4me, you paste your HTML in the action, and the branded PDF is uploaded back. No code—just configure, map fields, and turn on the Zap.
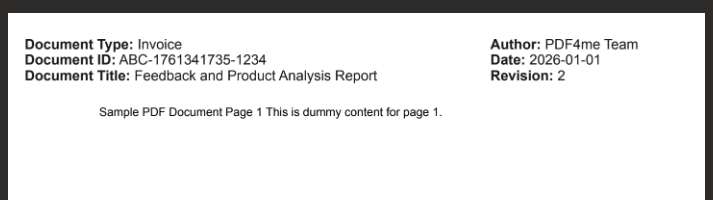
Result: A plain PDF like sample_3_page.pdf becomes Header_PDF_ZAP.pdf with a professional header showing Document Type, ID, Title, Author, Date, and Revision—ready to share or archive.
Every step name, field, folder path, and mapping below is fact-checked from the Zapier UI in the screenshots. Use this as your setup guide from scratch.
What Do You Need Before You Build?
- Zapier — Zapier account. Create a new Zap and add one trigger plus two actions.
- PDF4me API key — Get your PDF4me API key (free to start). When you add the Add HTML Header/Footer action, you'll connect PDF4me. First time? Follow Connect PDF4me to Zapier.
- File storage — This guide uses Dropbox for the trigger and Upload File steps so you can follow the screenshots. It's not Dropbox-only: the same Zap pattern works with Google Drive, SharePoint, OneDrive, or other Zapier apps that offer "New File in Folder" and "Upload File." Swap in the equivalent steps—the logic stays the same.
What Does the Zap Look Like? (3 Steps)
The Zap runs in this order (screenshot from a real setup):
- 1. New File in Folder (Dropbox) — Trigger: when a new file appears in a folder (e.g. every 2 minutes). You set the Folder path and choose whether to include file contents.
- 2. Add HTML Header/Footer (PDF4me) — Sends the PDF from step 1 to PDF4me, adds your custom HTML as header or footer, and returns the processed file. You paste HTML and map the file.
- 3. Upload File (Dropbox) — Saves the branded PDF from step 2 to a folder. You set the output Folder, Specify File Name (e.g.
Header_PDF_ZAP), and Specify File Extension (.pdf).
Same file, branded—every time.
Before and After
Input: A plain PDF (e.g. "Sample PDF Document Page 1 This is dummy content for page 1.") in the watched folder.
Input File

Output: The same PDF with a custom HTML header showing Document Type, Document ID, Document Title, Author, Date, and Revision.
Output File
Step 1: Where Do Your PDFs Come In?
Configure the New File in Folder trigger so the Zap runs when a new file is added to a folder. The trigger provides the file; step 2 will process it.
So far: 1. New File in Folder (trigger).
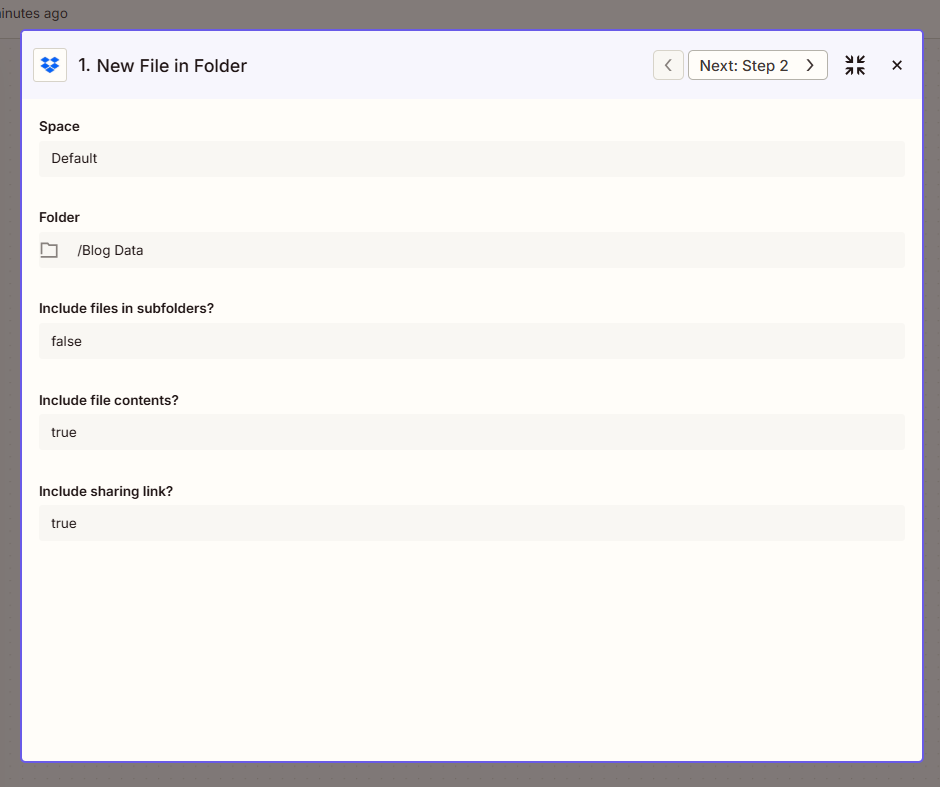
- Add trigger — In your Zap, set the trigger to Dropbox (or your storage app) → New File in Folder.
- Configure (fact-checked from screenshot):
- Space — e.g. Default (or your Dropbox space).
- Folder (required) — Enter the path to the folder to watch, e.g.
/Blog Data. Use the folder picker if available. - Include files in subfolders? — Set to False if you only want files in that folder (not in nested subfolders). Use True to include subfolders.
- Include file contents? — Set to True so the file content is available for the PDF4me step.
- Include sharing link? — Set to True if you need a sharing link; otherwise False is fine.
- Set the trigger frequency (e.g. every 2 minutes) if available.
- Click Continue and run a test so the trigger returns sample data.
Step 2: Add Your HTML Header or Footer
Add the Add HTML Header/Footer action (PDF4me) to process the PDF and apply your custom HTML.
So far: 1. New File in Folder → 2. Add HTML Header/Footer.
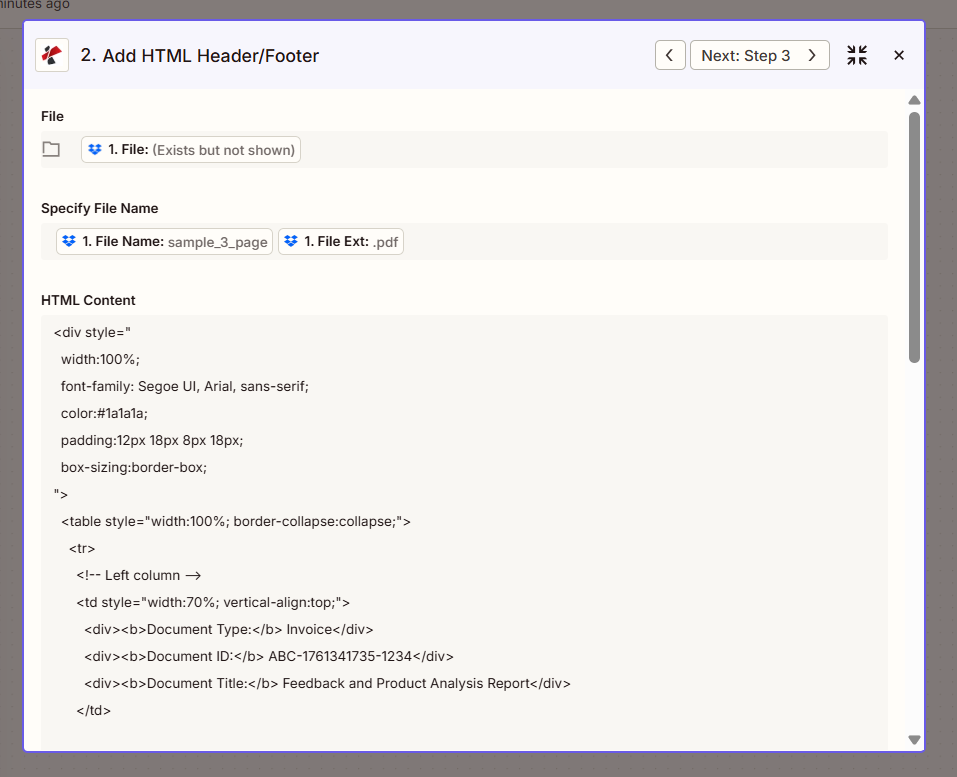
- Add action — Search PDF4me → Add HTML Header/Footer.
- Configure (fact-checked from screenshot):
- File (required) — Map 1. File from the New File in Folder step (Zapier will show "1. File: (Exists but not shown)").
- Specify File Name — Map 1. File Name from step 1 (e.g.
sample_3_pageor the base name without extension). - Specify File Extension — Map 1. File Ext from step 1 (e.g.
.pdf). - HTML Content (required) — Paste your header or footer HTML. Example from the screenshot:
Example: Header with Document Type, ID, Title, Author, Date, RevisionPaste this into the HTML Content field; replace values with your own or Zapier variables.
<div style="width:100%; font-family: Segoe UI, Arial, sans-serif; color:#1a1a1a; padding:12px 18px 8px 18px; box-sizing:border-box;">
  <table style="width:100%; border-collapse:collapse;">
    <tr>
      <td style="width:70%; vertical-align:top;">
        <b>Document Type:</b> Invoice<br/>
        <b>Document ID:</b> ABC-1761341735-1234<br/>
        <b>Document Title:</b> Feedback and Product Analysis Report
      </td>
      <td style="width:30%; vertical-align:top; text-align:right;">
        <b>Author:</b> PDF4me Team<br/>
        <b>Date:</b> 2026-01-01<br/>
        <b>Revision:</b> 2
      </td>
    </tr>
  </table>
</div>
- Location — Choose Header or Footer depending on where you want the HTML.
- Pages — Set to all to add the header/footer to every page.
- Click Continue and test. The output will include 2. File Url (or similar)—the processed PDF. You'll use this in step 3.
For all parameters and options, see Add HTML Header Footer to PDF — Zapier.
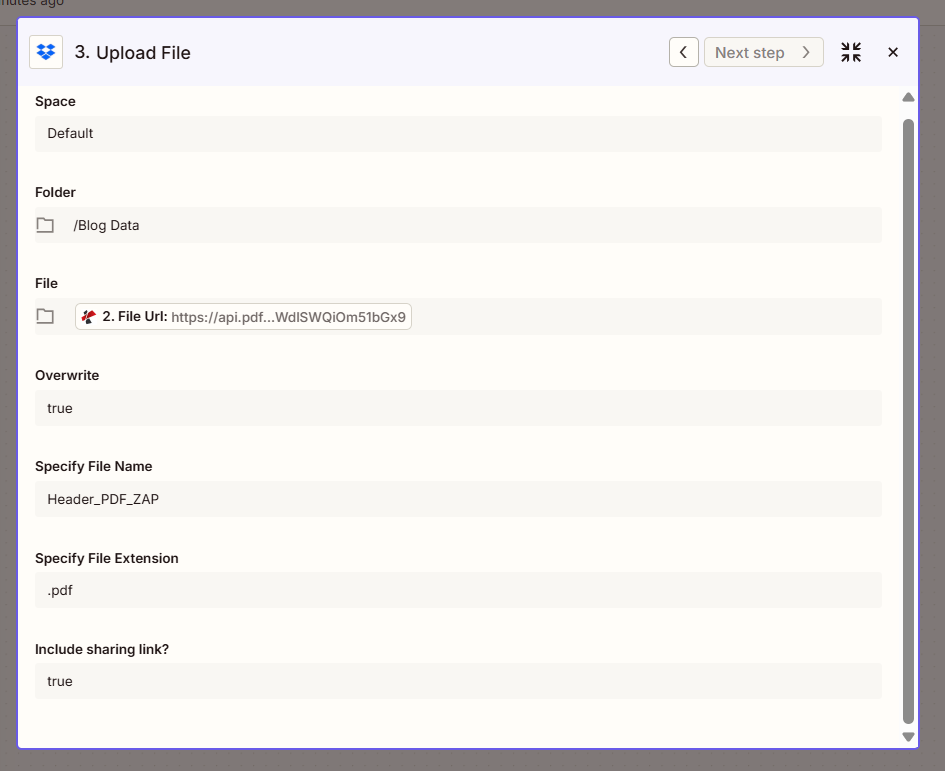
Step 3: Where Does the Branded PDF Go?
Add the Upload File action to save the processed PDF to a folder.
So far: 1. New File in Folder → 2. Add HTML Header/Footer → 3. Upload File.
- Add action — Dropbox → Upload File.
- Configure (fact-checked from screenshot):
- Space — e.g. Default.
- Folder (required) — Target folder path, e.g.
/Blog Data. - File (required) — Map 2. File Url from the Add HTML Header/Footer step (the processed PDF from PDF4me). Do not use the file from step 1—that is the original; you want the output from step 2.
- Overwrite — Set to True if you want to replace an existing file with the same name; False to keep existing files.
- Specify File Name — Enter a name (e.g.
Header_PDF_ZAP) or map a value from a previous step. In the screenshot we useHeader_PDF_ZAP. - Specify File Extension — Set to
.pdf. - Include sharing link? — Set to True if you need a shareable link; otherwise False.
- Click Continue and test. The branded PDF will appear in the folder.
Summary: File in Upload File must come from 2. File Url (Add HTML Header/Footer). Specify File Name can be static (e.g. Header_PDF_ZAP) or mapped from step 1 (e.g. 1. File Name with a prefix). Same PDF, branded—every time.
Sample HTML Snippets: Copy and Use
These snippets work in the HTML Content field. Replace placeholders with your own text or Zapier variables.
Two-column header (metadata left, author/date right)Use for reports and invoices.
<table style="width: 100%; border-collapse: collapse; font-family: Arial, sans-serif; font-size: 11px;">
  <tr>
    <td style="width: 50%; vertical-align: top;">Document title or type</td>
    <td style="width: 50%; text-align: right; vertical-align: top;">
      Author: Your Name<br/>
      Date: 2026-01-01<br/>
      Revision: 1
    </td>
  </tr>
</table>
Simple centered footerUse for legal or confidential notices.
<div style="text-align: center; font-family: Arial, sans-serif; font-size: 9px; color: #666666;">
  Confidential. For internal use only.
</div>
Footer with company addressAdapt for your company.
<div style="text-align: right; font-family: Arial, sans-serif; font-size: 9px;">
  <strong>Your Company</strong><br/>
  Street, City, Country<br/>
  Tel: +1 234 567 890 | Email: [email protected]
</div>
Paste any snippet above into the Add HTML Header Footer to PDF tester, add your API key and a sample PDF, and choose Header or Footer. Each block is ready to copy.
How Does It All Connect?
In a Nutshell
- New File in Folder starts the Zap when a file appears; it provides 1. File, 1. File Name, and 1. File Ext.
- Add HTML Header/Footer (PDF4me) takes 1. File and your HTML, returns the branded PDF as 2. File Url.
- Upload File takes 2. File Url and saves it to your folder with the name and extension you specify.
- Need help connecting PDF4me? See Connect PDF4me to Zapier.
Where Can You Use This?
Invoice and report branding
Problem: Invoices and reports need a consistent header with document type, ID, and date.
Solution: Use this Zap to add a header with Invoice/Report metadata, author, and revision. Every PDF that lands in the folder gets branded automatically.
Trigger: New File in Folder (Dropbox, Google Drive, etc.)
Legal and confidential footers
Problem: Contracts and sensitive documents need a "Confidential" or legal disclaimer footer on every page.
Solution: Add a footer with your disclaimer text. Use simple HTML and inline CSS for reliable PDF output.
Trigger: New File in Folder
Company letterhead and logo
Problem: PDFs need your logo and company info in the header.
Solution: Use an img tag with a public URL for your logo and add company name, address, and contact in the HTML Content field.
Trigger: New File in Folder
Stuck? Common Questions
- What if I want both header and footer? Set Location to Both in the Add HTML Header/Footer action, or run the action twice (once for header, once for footer) with different HTML.
- Can I use dynamic content from previous steps? Yes. Map Zapier variables (e.g. from a form, CRM, or spreadsheet) into your HTML. Build the HTML string in a Formatter step if needed.
- Can I use SharePoint or Google Drive instead of Dropbox? Yes. Choose the same trigger and Upload File actions for your app. Map the file and output the same way—the Zap pattern stays the same.
Want to Go Deeper?
| Resource | Description |
|---|---|
| Connect PDF4me to Zapier | Create the PDF4me connection and add your API key |
| Add HTML Header Footer — Zapier | Full action reference: parameters, output, and options |
| Add HTML headers in Make | Same idea (Download → Add Header/Footer → Upload) on Make |
| Add HTML Header Footer — Power Automate | Same idea in Power Automate |
| Add HTML headers in n8n | Same idea in n8n |
| Add HTML Header Footer API Tester | Test your HTML with a sample PDF before wiring the Zap |
Off-page (open in new tab):
- PDF4me API key dashboard — Get or manage your API key
- Zapier — Create and run Zaps
What to Do Next
Recap: New File in Folder → Add HTML Header/Footer (PDF4me) → Upload File. File in step 2 = 1. File. File in step 3 = 2. File Url.
- Get an API key — PDF4me API key dashboard (free to start). Use it when Zapier asks for the PDF4me connection.
- New to PDF4me + Zapier? — Connect PDF4me to Zapier walks you through the connection. Then open Zapier → Create Zap → add trigger New File in Folder (Dropbox) → Add HTML Header/Footer (PDF4me) → Upload File.
- Build the Zap from scratch — Follow Steps 1–3 above: trigger folder
/Blog Data(Include file contents True) → Add HTML Header/Footer with File from step 1, paste your HTML → Upload File with File from step 2 (2. File Url), Specify File Name e.g.Header_PDF_ZAP, Specify File Extension.pdf. - Full action reference — Add HTML Header Footer — Zapier for all parameters and output.