Stamp Your Logo and Metadata on Every PDF Page using HTML Headers & Footers via Power Automate!
Add a company logo, document metadata (author, date, revision), or customer-specific footers to your PDFs using Power Automate—no code required. This guide walks you through the full 5-step flow (trigger → get PDF → get header file → Add HTML Header Footer to PDF → create file) with screenshots for every step, then sample HTML snippets you can copy and use for branding, page numbers, and per-customer footers, plus use cases like report headers and reusable templates.
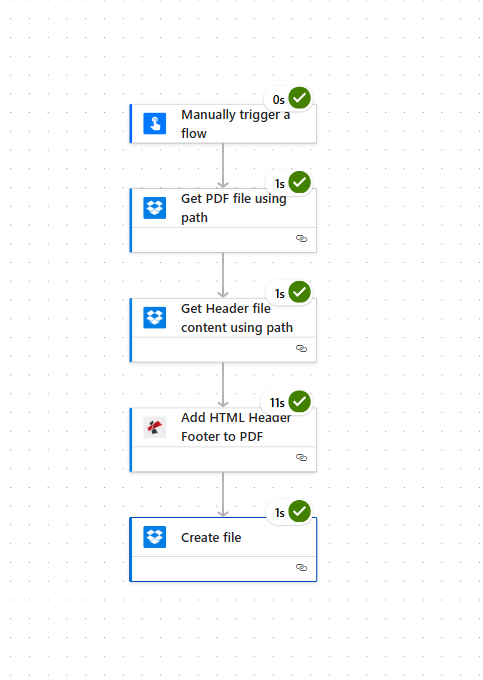
Add HTML Header Footer in Power Automate: The 5-Step Flow
Here’s the full flow in Power Automate: trigger → Get PDF file using path (Dropbox) → Get Header file content using path (Dropbox) → Add HTML Header Footer to PDF (PDF4me) → Create file (Dropbox). Every step name and parameter below matches the UI in the screenshots.
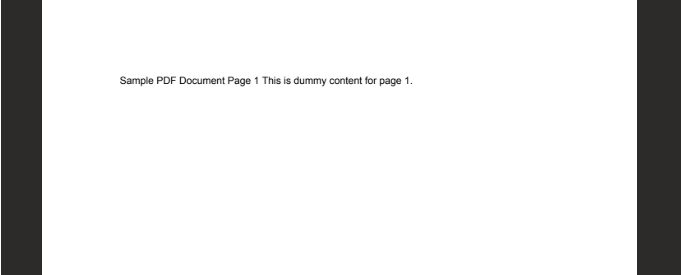
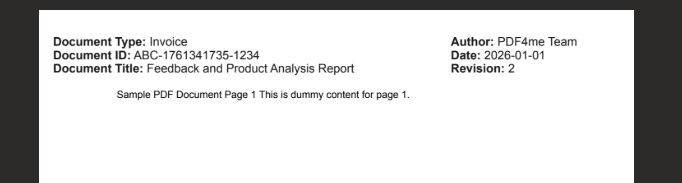
Before and after: The input PDF is a simple document (e.g. “Sample PDF Document Page 1…”). After the flow runs, the same PDF has an HTML header with document type, ID, title, author, date, and revision—all from your header file.
Input PDF
Output PDF
Step 1: Trigger the flow
Add Manually trigger a flow (for testing) or another trigger (e.g. when a file is created in a folder). No parameters to set.
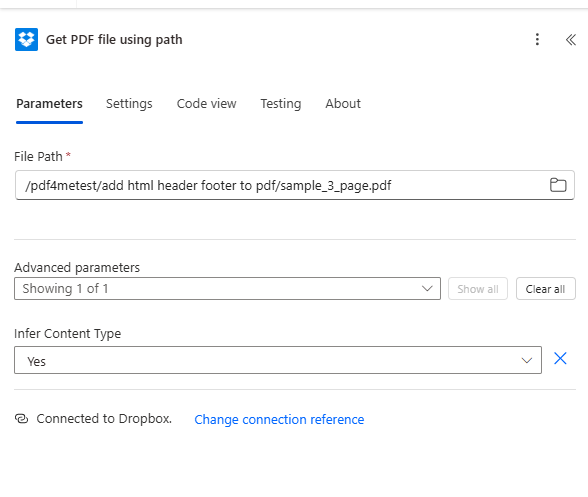
Step 2: Get PDF file using path (Dropbox)
This step loads the PDF you want to add the header or footer to.
- Add action → Dropbox → Get file content (or the action that gets a file by path; in the screenshot it is Get PDF file using path).
- Parameters (fact-checked from screenshot):
- File Path (required) — Full path to your PDF in Dropbox, e.g.
/pdf4metest/add html header footer to pdf/sample_3_page.pdf. Use the folder icon to browse if needed. - Open Advanced parameters → set Infer Content Type to Yes.
- File Path (required) — Full path to your PDF in Dropbox, e.g.
- At the bottom: Connected to Dropbox. Use Change connection reference if you need to switch accounts.
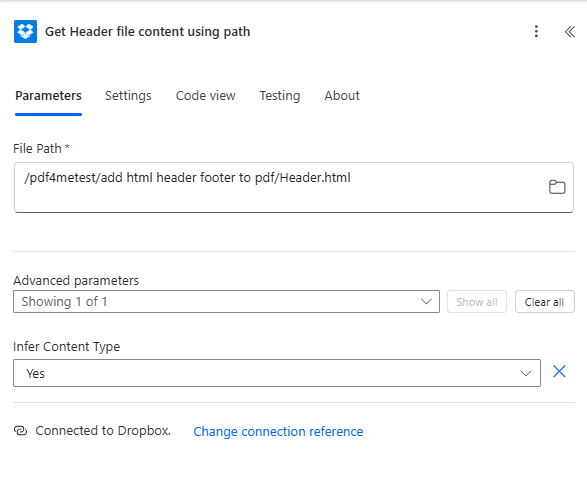
Step 3: Get Header file content using path (Dropbox)
This step loads the HTML for your header (or footer). Store your PDF-friendly HTML in a file (e.g. Header.html) in Dropbox and read it here.
- Add action → Dropbox → Get file content (or Get Header file content using path as in the screenshot).
- Parameters (fact-checked from screenshot):
- File Path (required) — Path to your HTML file, e.g.
/pdf4metest/add html header footer to pdf/Header.html. - Advanced parameters → Infer Content Type: Yes.
- File Path (required) — Path to your HTML file, e.g.
- Connected to Dropbox. at the bottom.
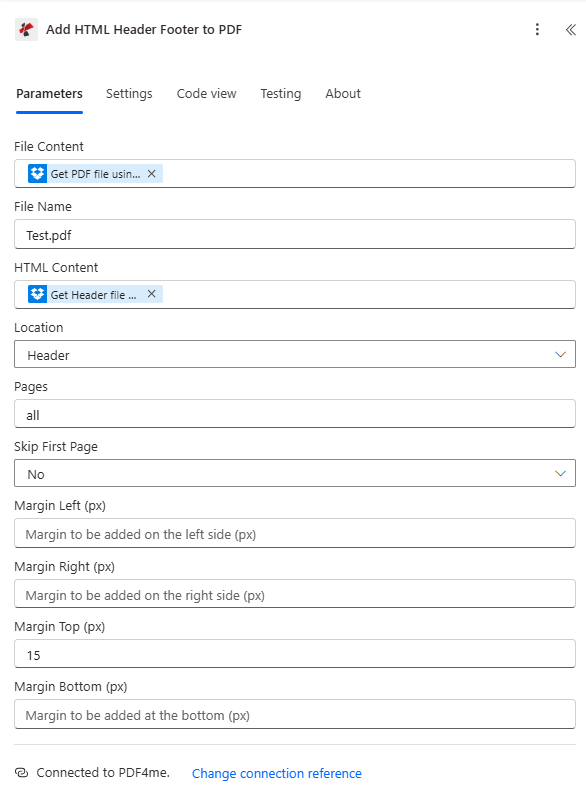
Step 4: Add HTML Header Footer to PDF (PDF4me)
This is the core step: it takes the PDF and the HTML and outputs a new PDF with the header (or footer) applied.
- Add action → PDF4me → Add HTML Header Footer to PDF.
- Parameters (fact-checked from screenshot):
- File Content (required) — Select the output from Get PDF file using path (the PDF binary from step 2).
- File Name — e.g.
Test.pdf(or the name of your source PDF). - HTML Content (required) — Select the output from Get Header file content using path (the HTML from step 3).
- Location — Header (or Footer if you are adding a footer).
- Pages — all so the header/footer is applied to every page.
- Skip First Page — No if you want the header on the first page too; set to Yes to skip it.
- Margin Top (px) — e.g. 15 (pixels). Leave Margin Left, Margin Right, and Margin Bottom empty or set as needed.
- At the bottom: Connected to PDF4me. Use your PDF4me API key when creating the connection.
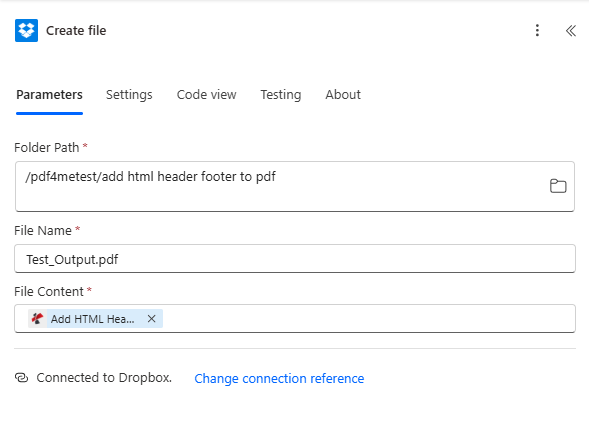
Step 5: Create file (Dropbox)
Save the PDF that comes out of the Add HTML Header Footer step back to Dropbox (or another folder).
- Add action → Dropbox → Create file.
- Parameters (fact-checked from screenshot):
- Folder Path (required) — e.g.
/pdf4metest/add html header footer to pdf. - File Name (required) — e.g.
Test_Output.pdf. - File Content (required) — Select the output from Add HTML Header Footer to PDF (the modified PDF). Do not use the output from Get PDF—that is the original file; the new file is the one from the PDF4me action.
- Folder Path (required) — e.g.
- Connected to Dropbox. at the bottom.
Run the flow. You should see a new file (e.g. Test_Output.pdf) in the folder with the HTML header or footer applied. For the full action reference, see Add HTML Header Footer to PDF in Power Automate.
Sample HTML Snippets: Copy & Test
Use these PDF-friendly snippets in the Add HTML Header Footer API Tester or Power Automate. Expand any snippet below to view and copy the code—keeps the list short until you need one.
Headers
Two-column (Author, Date, Revision)Right column stays aligned; replace text with your own or flow variables.
<table style="width: 100%; border-collapse: collapse; font-family: Arial, sans-serif; font-size: 11px;">
  <tr>
    <td style="width: 50%; vertical-align: top;"></td>
    <td style="width: 50%; text-align: right; vertical-align: top;">
      Author: Per Nordqvist<br/>
      Date: 2025-11-12<br/>
      Revision: 4.24
    </td>
  </tr>
</table>
Header with page numbersUse placeholders {{page}} and {{total}} in the HTML; PDF4me replaces them per page.
<table style="width: 100%; border-collapse: collapse; font-family: Arial, sans-serif; font-size: 11px;">
  <tr>
    <td style="width: 50%; vertical-align: top;">Document title</td>
    <td style="width: 50%; text-align: right;">
      Author: Your Name | Date: 2025-11-12 | Page 1 of 5
    </td>
  </tr>
</table>
Simple centered one-line
<div style="text-align: center; font-family: Arial, sans-serif; font-size: 12px; color: #333333;">Document Title - Confidential</div>
Three-column (left / center / right)Logo area, title, date/revision.
<table style="width: 100%; border-collapse: collapse; font-family: Arial, sans-serif; font-size: 11px;">
  <tr>
    <td style="width: 25%; vertical-align: middle;">[Logo]</td>
    <td style="width: 50%; text-align: center; vertical-align: middle;">Project Report 2025</td>
    <td style="width: 25%; text-align: right; vertical-align: middle;">2025-11-12 | v1.0</td>
  </tr>
</table>
Header with bottom border
<table style="width: 100%; border-collapse: collapse; font-family: Arial, sans-serif; font-size: 12px; border-bottom: 1px solid #cccccc;">
  <tr>
    <td style="padding: 4px 0;">Technical Specification</td>
    <td style="text-align: right; padding: 4px 0;">Revision 4.24</td>
  </tr>
</table>
Two-line title + subtitle
<table style="width: 100%; border-collapse: collapse; font-family: Arial, sans-serif;">
  <tr>
    <td style="font-size: 14px; font-weight: bold;">Quarterly Report Q4 2025</td>
  </tr>
  <tr>
    <td style="font-size: 10px; color: #666666;">Prepared by Finance Team</td>
  </tr>
</table>
Right-aligned metadata only
<div style="text-align: right; font-family: Arial, sans-serif; font-size: 10px;">Author: Jane Doe<br/>Date: 2025-11-12<br/>Doc ref: DR-2025-001</div>
Left title + right revision (one row)
<table style="width: 100%; border-collapse: collapse; font-family: Arial, sans-serif; font-size: 11px;">
  <tr>
    <td style="width: 70%; vertical-align: top;">Contract Agreement</td>
    <td style="width: 30%; text-align: right; vertical-align: top;">Revision 4.24 | 2025-11-12</td>
  </tr>
</table>
Colored header (e.g. red)Centered colored text.
<div style="text-align: center; font-family: Arial; font-size: 12px; color: #FF0000;">Document Header PDF4me</div>
Footers
Legal / confidential
<table style="width: 100%; border-collapse: collapse; font-family: Arial, sans-serif; font-size: 9px; color: #666666;">
  <tr>
    <td style="text-align: center; padding: 4px 0;">Confidential. For internal use only. All rights reserved.</td>
  </tr>
</table>
Page number onlyUse placeholders in flow for dynamic "Page X of Y".
<div style="text-align: center; font-family: Arial, sans-serif; font-size: 10px;">Page 1 of 5</div>
Small disclaimer
<div style="font-family: Arial, sans-serif; font-size: 8px; color: #888888; text-align: center;">This document is provided as-is. No warranty.</div>
Before you send HTML: checklist
The Add HTML Header Footer API expects plain HTML in htmlContent (not Base64). For reliable PDF output:
- Inline CSS — Use
style="..."on elements. The API supports inline CSS; external stylesheets are not applied in the header/footer area. - Table or simple blocks — Use a
<table>or divs with explicitwidth(e.g.width: 50%) so columns do not reflow or wrap in the PDF engine. - Layout — For predictable results, use table-based or block layout with explicit widths; many PDF engines handle these well.
- Units — Use
pxor%for font-size and margins; the API margin parameters are in pixels. - Test first — Paste your snippet into the Add HTML Header Footer to PDF tester with a sample PDF and your API key before using it in Power Automate or other flows.
Paste any snippet above into the htmlContent field of the Add HTML Header Footer to PDF tester, add your API key and a sample PDF, and choose Header or Footer. Each code block is a single selection to copy.
Company Logo, Customer-Specific Footers, and Additional Information
You can use the same Add HTML Header Footer API to add a company logo in the header, different footer information per customer, and any extra fields (invoice number, project code, account ID) by building the HTML from your data and passing it as htmlContent.
Header or footer with company logo
The API supports embedded images in HTML. Use an <img> tag with a public URL or a Base64 data URI so the logo appears in the header or footer. Keep the image small and inside a table so the layout stays PDF-friendly.
Example: header with logo (left) and company name + tagline (right)Replace the logo URL; use Header as location in API or Power Automate.
<table style="width: 100%; border-collapse: collapse; font-family: Arial, sans-serif; font-size: 11px;">
  <tr>
    <td style="width: 80px; vertical-align: middle; padding-right: 12px;">
      <img src="https://your-domain.com/logo.png" alt="Logo" style="max-width: 72px; max-height: 36px; display: block;" />
    </td>
    <td style="vertical-align: middle;">
      <strong>Your Company Name</strong><br/>
      <span style="font-size: 9px; color: #666666;">Tagline or document type</span>
    </td>
  </tr>
</table>
Replace https://your-domain.com/logo.png with your logo URL (or a Base64 data URI if your setup supports it). Use Header as the location when calling the API or Power Automate action.
Footer information per customer
When you generate PDFs for multiple customers, you can add different footer information for each by building the HTML string from your customer or document data. In Power Automate, use variables from "Apply to each" (e.g. customer name, account ID, document ref); in code, build the string from your list or API response before calling Add HTML Header Footer.
Example: footer with customer name and account infoReplace placeholders with your flow variables (e.g. CustomerName, AccountId, DocumentRef).
<table style="width: 100%; border-collapse: collapse; font-family: Arial, sans-serif; font-size: 9px; color: #666666;">
  <tr>
    <td style="text-align: center; padding: 4px 0;">
      Prepared for: Customer Name | Account: ACC-12345 | Doc ref: INV-2025-001
    </td>
  </tr>
</table>
Replace Customer Name, ACC-12345, and INV-2025-001 with your flow variables or fields (e.g. CustomerName, AccountId, DocumentRef). Call the API once per document so each PDF gets the correct footer.
Adding additional information
You can include any extra information in the header or footer: invoice number, PO number, project code, department, revision, or custom text. Use the same approach: build a single HTML string that includes those values (from your flow, list, or database), then pass it as htmlContent. Keep the structure simple (table or div with inline styles) so it stays PDF-friendly. Combine with a logo or with customer-specific lines as in the examples above.
Where to Use It: Power Automate vs API
You can add headers and footers in two ways:
- Power Automate — Use the Add HTML Header Footer to PDF action. Put your PDF in File Content, your HTML in HTML Content, and choose Header, Footer, or Both. Set Pages (e.g.
all) and margins as needed. - API — Call
POST /api/v2/AddHtmlHeaderFooterwith docContent (Base64 PDF), docName, htmlContent (plain HTML), and location (Header, Footer, or Both). Optional: pages, skipFirstPage, and margin parameters.
Use the same HTML in either place; the snippets in this post work in both.
Advanced Use Cases
Here are advanced use cases for HTML headers and footers:
1. Technical and report headers (Author, Date, Revision)
Use case: You generate reports or technical docs (e.g. from Power Automate, SharePoint, or a BI tool) and need a header with Author, Date, and Revision (or version) on every page for traceability and compliance.
Why two columns: Left column for logo or document title; right column for metadata so it stays aligned and does not wrap into one line. Use a simple table with fixed column widths and inline styles.
Tip: Build the HTML string in your flow (e.g. with dynamic Author/Date/Revision from a list or variable), then pass it to the Add HTML Header Footer action.
2. Automated report branding in Power Automate
Use case: A flow generates or fetches a PDF (e.g. from Power BI, Excel, or a template), then adds a branded header or footer before saving to SharePoint, sending by email, or archiving.
Tip: Use a table or simple divs with inline CSS and explicit widths. Test your HTML in the Add HTML Header Footer API Tester first, then plug it into your flow.
3. Versioned and revision headers for compliance
Use case: Deliverables, contracts, or audit documents need a clear revision number (e.g. 4.24) and date in the header so every page is traceable.
Why it matters: Auditors and stakeholders expect to see version info on every page. A two-column header (e.g. project name left, "Revision: X.XX | Date: YYYY-MM-DD" right) keeps that info visible and stable in the PDF.
Tip: In Power Automate, build the HTML string from flow variables (e.g. Revision from a list row or a calculated value) so each run stamps the correct version.
4. Design in the browser, apply via API
Use case: You design the header in an .html file and open it in Microsoft Edge (or Chrome) to check layout, then apply that same design to PDFs via the Power Automate API.
Takeaway: Use the browser to design, but finalize the snippet with PDF-friendly HTML (table + inline CSS). Keep that snippet as your "template" for the API or flow.
5. Sharing and reusing header templates
Use case: Once you have a working header, you want to reuse it across flows or share it with colleagues.
Takeaway: Save your working HTML as a template (e.g. in a SharePoint file, a flow variable, or a snippet in your docs). Replace placeholders (Author, Date, Revision, page numbers) with dynamic values when calling the API or Power Automate. The examples in this post are ready to copy and adapt.
Next Steps
- Try the API — Paste your HTML and a sample PDF into the Add HTML Header Footer to PDF tester and compare output.
- Wire it in Power Automate — Follow Add HTML Header Footer to PDF in Power Automate and use the same HTML snippet.
- Read the full API — Add HTML Header Footer to PDF (PDF4me API) for all parameters (margins, pages, async).