Image Compression API: Step-by-Step Postman Test, Smaller JPGs, and SEO-Friendly Delivery
Heavy images slow pages, inflate bandwidth bills, and work against Core Web Vitals—especially Largest Contentful Paint (LCP) when a large photo is the hero element. An image compression API lets you shrink JPG/PNG payloads in the pipeline (upload handlers, CMS imports, DAM workflows) instead of fixing files by hand.
This walkthrough uses PDF4me POST /api/v2/CompressImage with Postman: same pattern works in code once the request shape is clear. For a no-code first test, use the interactive Compress Image API Tester—it hits the same endpoint with form fields instead of raw JSON.
- Follow steps 1 → 5; screenshots match a real run (your timings and byte counts will vary with image content and network).
- Replace the Postman placeholder
{{BASE64_OF_INPUT_IMAGE}}with the Base64 of your file—nodata:image/jpeg;base64,prefix in the JSON string. - After a successful call, decode the response to a
.jpgand compare file size in Explorer (or macOS Finder) to the original.
1. Base64-encode your image → 2. POST https://api.pdf4me.com/api/v2/CompressImage with Content-Type: application/json and Authorization (your PDF4me API key) → 3. JSON body: docContent, docName, imageType, compressionLevel, async → 4. Expect 200 OK and a JPEG payload (raw bytes or Base64, depending on how your client displays it) → 5. Save and compare disk size to the source file.
Why teams use an image compression API (market context)
| Priority | What changes with an API |
|---|---|
| Web performance | Smaller images decode faster and transfer quicker—important when LCP depends on a single large asset. |
| SEO & UX | Search engines reward pages that load reliably on mobile; lighter images reduce time-to-interactive friction. |
| Operations | One HTTP contract for microservices, serverless upload handlers, and ETL jobs—no desktop tools in the loop. |
| Cost | Less egress and storage versus serving multi‑MB originals everywhere. |
PDF4me exposes compression levels (Max, Medium, Low) so you can align with thumbnails vs. hero imagery. See the parameter overview in Compress Image (full API reference) and the quick table below.
Before you send the first request
- API key: from the PDF4me dashboard (used in the Authorization header per official docs).
- Input format: JPG or PNG (see API Tester parameter notes).
- Large files / timeouts: set
"async": truewhen recommended, or preprocess with Resize Image if pixels far exceed display size. - Quota: failed auth or plan limits—use PDF4me troubleshooting if you see 401/402-style errors.
Reference: JSON body fields
| Field | Role |
|---|---|
| docContent | Base64 of the source image (required). |
| docName | Output filename, e.g. output.jpg (required). |
| imageType | Output format, e.g. JPG or PNG. |
| compressionLevel | Max, Medium, or Low. |
| async | true / false—use async when processing time might exceed client timeouts. |
Step 1 — Start from a real “before” file
Use any large JPG for practice. The reference run below used a ~4.5 MB source file named input.jpg in Windows Explorer—large enough that compression is visibly meaningful in folder properties.

Step 2 — Configure the Postman request (method + URL)
- Method:
POST - URL:
https://api.pdf4me.com/api/v2/CompressImage
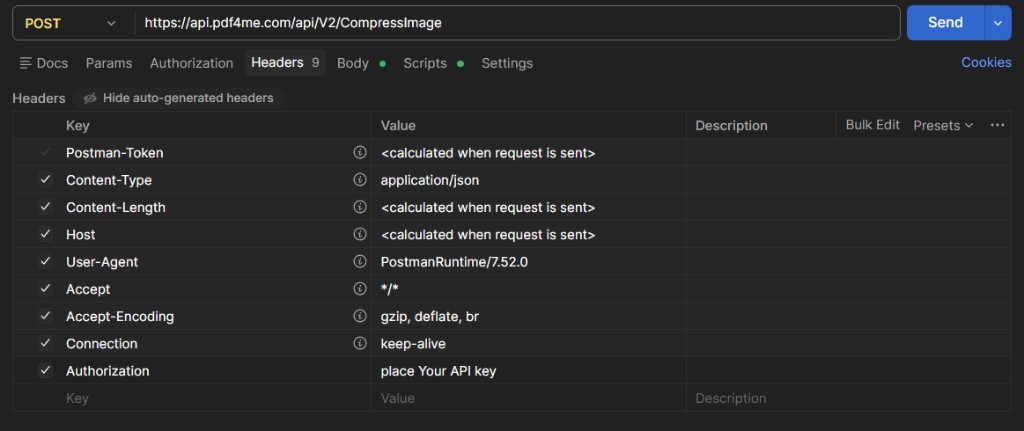
Open the Headers tab. At minimum you need Content-Type: application/json and your PDF4me key in Authorization (replace the placeholder from the screenshot with your real key).
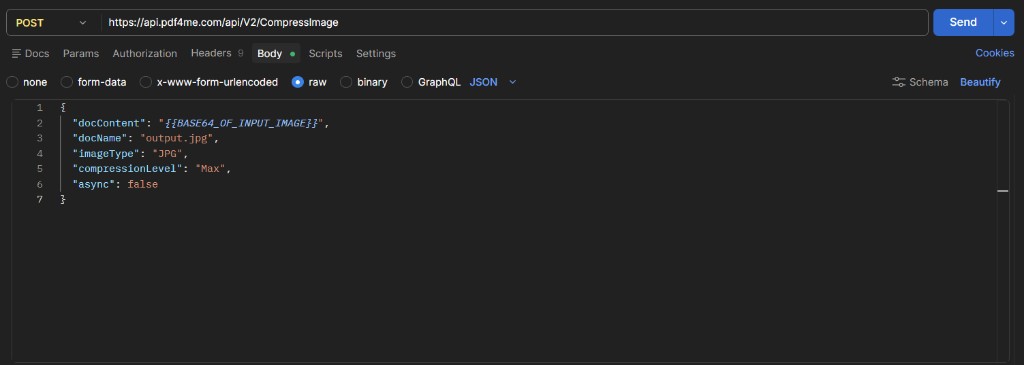
Step 3 — Set the raw JSON body
Choose Body → raw → JSON, then paste a payload shaped like this (swap in your Base64 string).

{
  "docContent": "PASTE_BASE64_HERE_NO_DATA_URL_PREFIX",
  "docName": "output.jpg",
  "imageType": "JPG",
  "compressionLevel": "Max",
  "async": false
}
Optional: minimal sanity checks before you click Send
- JPEG Base64 often starts with
/9j/when the tool shows the string form—that maps to the JPEG file signature. - If Postman is slow, the request may still succeed—watch for 200 OK and save the output; consider
async: truefor production batch jobs. - For a guided form instead of JSON, open Compress Image in the API Tester and compare the same fields side by side.
Step 4 — Send and read the response
When the client shows Base64
If the Body viewer is set to Base64 and you see a long line starting with /9j/, the payload is JPEG data encoded for display. Decode it to a file and open it in an image viewer to confirm quality.
When the client shows raw binary
Some views render raw bytes (metadata such as XMP may appear as readable text inside the stream). A 200 OK still means the compressed image was returned—save the body as output.jpg using your client’s “Save response” option.
Step 5 — Compare “after” file size on disk
After you write the response to disk, check Properties again. In the reference run, the compressed file landed near ~2.6 MB—a useful reduction on a multi‑megabyte photo while keeping workflow simple. Your ratio depends on content, dimensions, and compressionLevel; try Medium or Low if Max is too aggressive for product shots.
![]()
Troubleshooting (quick)
Confirm the key in Authorization and that the key is active. See API docs and troubleshooting.
Try "async": true where supported, or reduce pixel dimensions first with Resize Image.
Strip data:image/...;base64, prefixes from docContent, remove line breaks in the Base64 string, and verify the source file opens locally.
Automate without Postman
- Interactive: Compress Image — API Tester (same endpoint, guided fields).
- Reference + samples: Compress Image — PDF4me API (multi-language samples on that page).
- No-code: Make — Compress an Image, n8n — Compress Image, Power Automate — Compress Image, Zapier — Compress Image.
Related reading
Summary: An image compression API belongs in the same toolbox as responsive images and CDN caching: it reduces bytes at the source so every downstream step is cheaper and faster. Start with the API Tester, reproduce the request in Postman using the steps above, then lift the JSON into your service or automation module when you are ready to ship.