Mixed PDFs in One Folder? Auto-Classify Them in Zapier and Route by Type using PDF4me Zap !
You get a mix of PDFs—invoices, contracts, receipts—and you need them sorted by type so the right workflow handles each one. Doing that by hand doesn't scale.
The fix: Define your classification rules on dev.pdf4me.com (using regex or JavaScript expressions), then run the same classification inside Zapier: when a new PDF lands in a folder → PDF4me Classify Document → use the returned Class Name to route or organize. Classification lives in your PDF4me account; Zapier just sends the file and gets back the class.
First, set up your classes on dev.pdf4me.com (e.g. pdf4me_invoice with a regex like invoice(.*)). Then, build the Zap in Zapier: New File in Folder → Classify Document. All steps and screenshots are fact-checked from the PDF4me and Zapier UIs.
What Do You Need?
- A PDF4me account — Sign in at PDF4me. Classification templates are created and stored in your account at Classify Document. You define expressions in regex or JavaScript (for AI-based classification, custom training can be arranged—contact PDF4me if needed).
- Zapier — Zapier account. Create a new Zap with one trigger and one action.
- A PDF4me API key — Get your PDF4me API key. Connect it when you add the Classify Document action. First time? See Connect PDF4me to Zapier.
- A file source — We use Dropbox – New File in Folder so the steps match our screenshots. You can use Google Drive, SharePoint, or any app that offers "New File in Folder" as a trigger. The flow stays the same: get the PDF → Classify Document → use Class Name in the next step.
Where Do You Set Up Classes?
Classification is defined and stored on dev.pdf4me.com. You create document classes and assign each class an expression (regex or JavaScript). When you call Classify Document from Zapier, PDF4me uses these templates to return a Class Name for the PDF you send. Do this part first so your Zap has something to run against.
Where Is Classify Document in PDF4me?
- Log in at PDF4me (dev.pdf4me.com).
- In the sidebar, click Classify Document. The page title is Classify Document and the subtitle is Classify your documents based on expressions.
How Do You Add or Edit a Class?
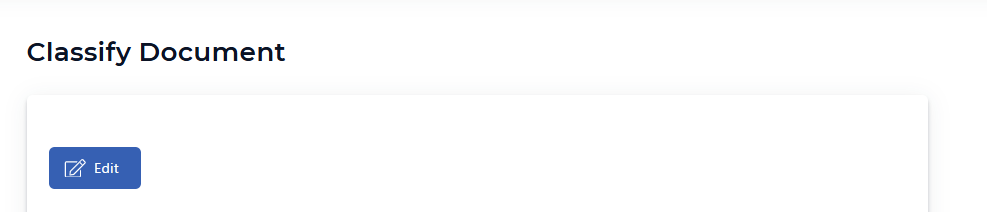
- On the Classify Document page, click the blue Edit button (with the pencil icon) to create a new classification template or modify an existing one.
- You'll see the class definition area where you can add document classes and define how each is matched.
What Goes in the Class Card?
- Under Class Name, click the + (plus) button to add a new class if needed.
- In the class card:
- Class Name — Give the class a name that will be returned by the API (e.g.
pdf4me_invoice). This is the value you'll see as Class Name (or Class Names) in Zapier. - Choose expression type — Select Regular Expression or JavaScript depending on how you want to match the document content.
- Regular Expression (if you chose regex) — Enter a pattern that identifies this document type. Example:
invoice(.*)to match documents containing the word "invoice" followed by any characters.
- Class Name — Give the class a name that will be returned by the API (e.g.
- Use Select Test File to pick a file, then click Test Classify to see which class it matches.
- Click Save Changes so the classes are saved to your PDF4me account. These are the templates that the Zapier Classify Document action will use.

Important: Classification on PDF4me uses expressions in regex or JavaScript. The guideline and UI are at Classify Document on PDF4me. For AI-based classification with custom training, PDF4me can schedule a call to help.
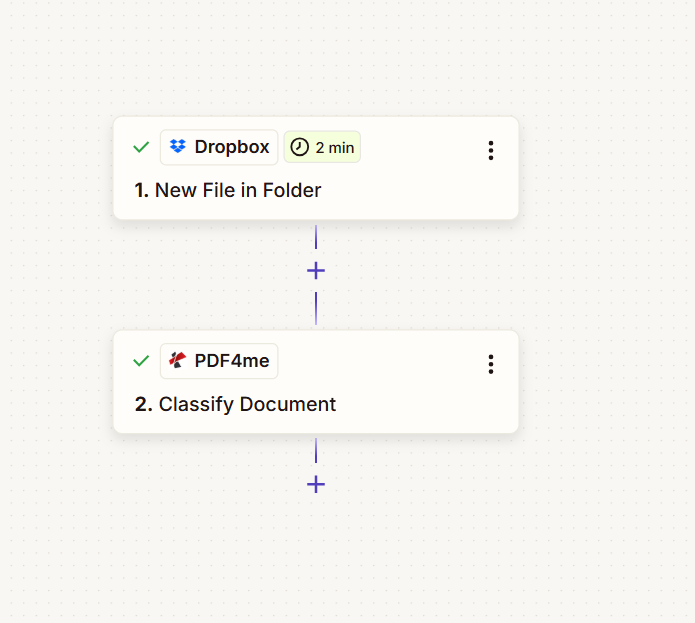
What Does the Zap Look Like? (2 Steps)
Once your classes exist on dev.pdf4me.com, you can run classification from Zapier: when a new PDF appears in a folder (e.g. Dropbox), send it to PDF4me – Classify Document. The action returns Class Names (e.g. pdf4me_invoice), which you can use for routing, renaming, or further steps.
Your Zap has two steps (screenshot below—all show a green checkmark when configured):
- 1. New File in Folder (Dropbox) — Trigger: when a new file appears in a folder (e.g. every 2 minutes). Provides 1. File, 1. File Name, and 1. File Ext.
- 2. Classify Document (PDF4me) — Takes 1. File and 1. File Name + 1. File Ext; returns Class Names (e.g.
pdf4me_invoice), Trace Id, and metadata. Full details: Classify Document — Zapier.
Step 1: Where Do Your PDFs Come In?
Configure the trigger so the Zap runs when a new file appears in your folder. The trigger must provide file contents so Step 2 can send the PDF to PDF4me.
Flow so far: 1. New File in Folder (trigger).
- Create a new Zap — In Zapier, click Create Zap (or + Create Zap).
- Add the trigger — In the trigger step, click Choose app → search Dropbox → select Dropbox → choose New File in Folder.
- Connect Dropbox — If prompted, connect your Dropbox account. Click Continue.
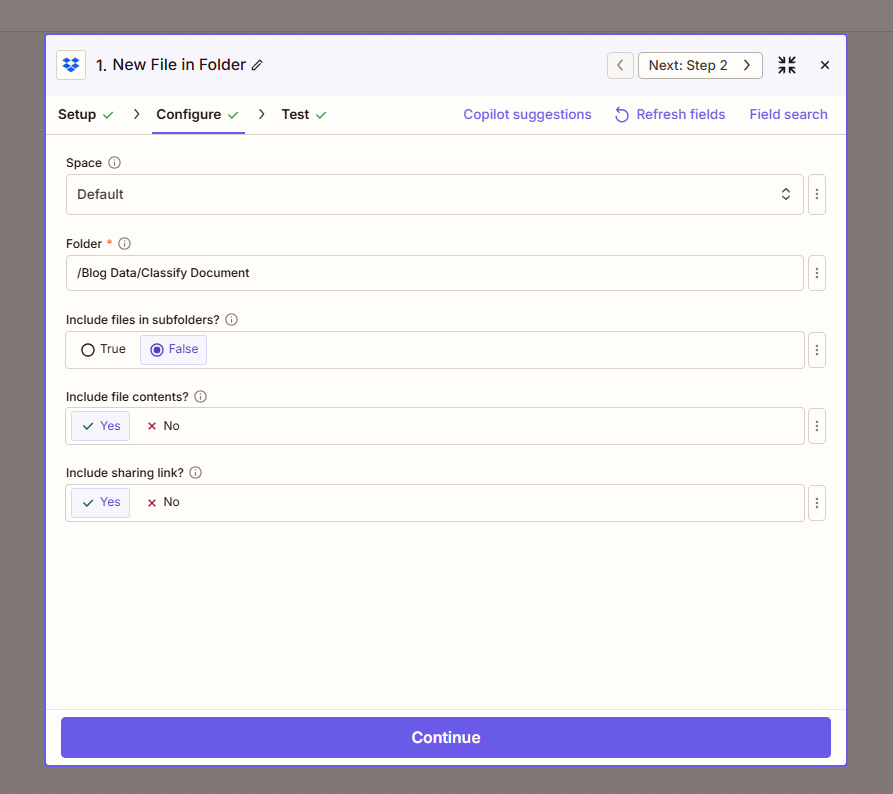
- Configure the trigger (from screenshot):
- Space — Select Default (or your Dropbox space).
- Folder (required) — Enter the path to the folder to watch, e.g.
/Blog Data/Classify Document. Use the folder picker if available. - Include files in subfolders? — Select False to watch only that folder; True to include subfolders.
- Include file contents? — Select Yes. Required—the PDF bytes must be available for Classify Document.
- Include sharing link? — Select Yes or No as needed.
- Set the trigger frequency — If shown, set how often Zapier checks (e.g. every 2 minutes).
- Test the trigger — Click Test trigger to pull in sample data. Ensure you have at least one PDF in the folder (e.g.
Pdf4me.pdf). The output will show 1. File, 1. File Name, 1. File Ext, and other fields.
Step 2: How Do You Classify the PDF?
Add the Classify Document action to classify the PDF using the templates you set up on dev.pdf4me.com.
Flow so far: 1. New File in Folder → 2. Classify Document.
- Add an action — Click the + button below the trigger step.
- Choose the app — Search PDF4me → select PDF4me → choose Classify Document.
- Connect PDF4me — If prompted, sign in with your PDF4me account or enter your API key. Click Continue.
- Configure the action (from screenshot):
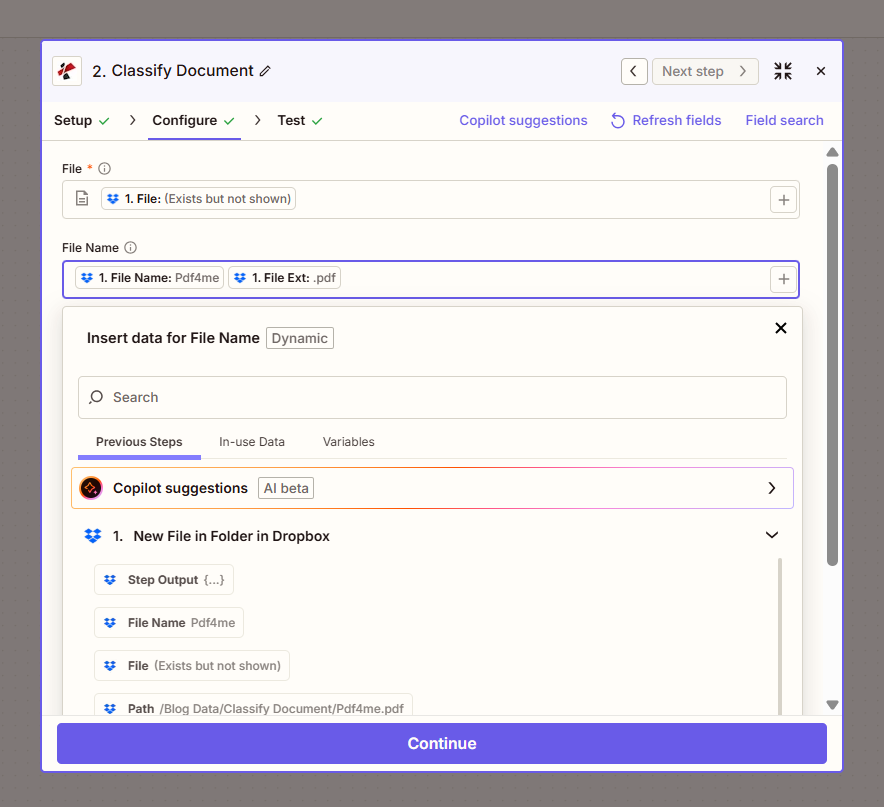
- File (required) — Click the field, open the Insert data panel, select 1. New File in Folder in Dropbox → choose 1. File (Zapier may show "1. File: (Exists but not shown)").
- File Name — Click the field, select 1. File Name and append 1. File Ext (e.g.
Pdf4me+.pdf). Or map 1. File Name and 1. File Ext separately if the action has distinct fields.
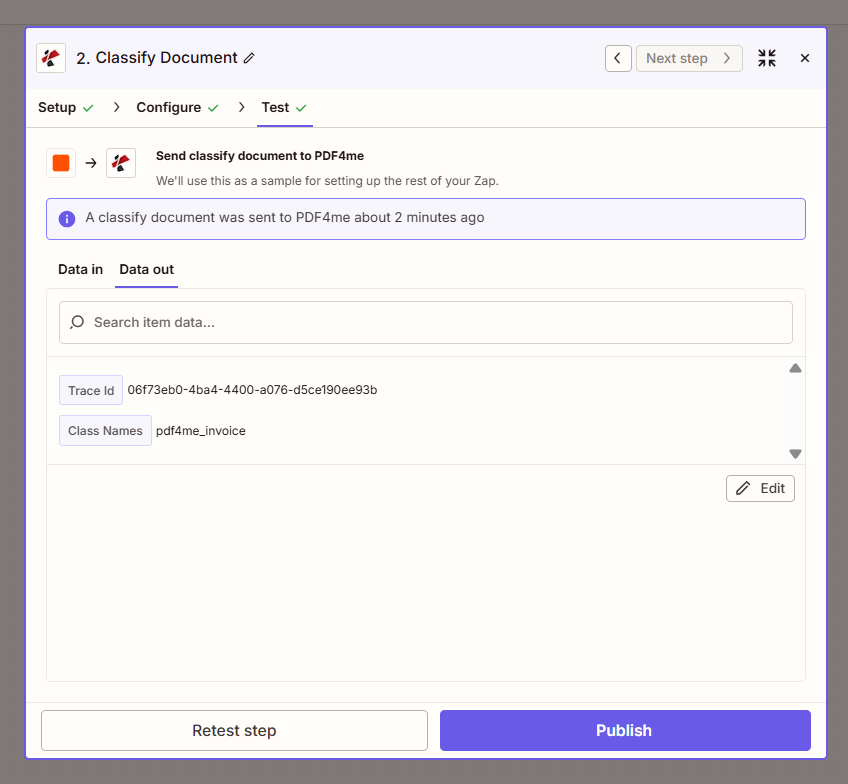
- Test the action — Click Test step (or Continue then Test). The output will show Class Names (e.g.
pdf4me_invoice), Trace Id, and other metadata. Each classification uses 1 credit.
Summary: Map File from 1. File (trigger). Map File Name from 1. File Name + 1. File Ext. The action returns 2. Class Names—use this in the next step to route or organize.
Step 3: What Can You Do With the Class Name?
The Classify Document output includes Class Names (e.g. pdf4me_invoice). In subsequent Zap steps you can:
- Add a Filter — Run the next action only when 2. Class Names equals a specific value (e.g.
invoice). - Use Paths — Branch your Zap: if 2. Class Names =
invoice, run one path (e.g. Upload File to/Accounting/Invoices/); ifcontract, run another (e.g. Upload File to/Legal/Contracts/). - Map to another app — Use 2. Class Names in Google Sheets, Airtable, or any app that accepts text.
Stuck? What Maps Where
Quick Reference: Field Mapping
- New File in Folder supplies 1. File (PDF content), 1. File Name, and 1. File Ext. Set Include file contents? Yes.
- Classify Document takes 1. File (required) and 1. File Name + 1. File Ext. Returns 2. Class Names (e.g.
pdf4me_invoice), 2. Trace Id, and metadata. - Use 2. Class Names in Filters, Paths, or the next action to route or organize by document type.
Key Takeaways!
How It Works
- Classification is defined on dev.pdf4me.com. Go to Classify Document in the PDF4me sidebar, use Edit, and add classes with regex or JavaScript expressions. Save your changes so Zapier can use these templates.
- Zapier only runs the classification. When a new PDF lands in a folder (e.g. Dropbox), pass 1. File and 1. File Name + 1. File Ext to PDF4me – Classify Document. The action returns Class Names (e.g.
pdf4me_invoice) so you can route or organize in later steps. - One credit per classification. Each Classify Document operation uses 1 credit. Use the Class Names output in Filters, Paths, or follow-up actions.
- For AI-based classification with custom training, PDF4me can help—reach out to schedule a call. For regex/JavaScript setup, use the Classify Document page and this guide.
Where Can You Use This?
Add classification templates in your PDF4me account, then use them in Zapier to route, rename, or trigger type-specific workflows:
Route invoices vs contracts to different folders
Problem: Mixed PDFs land in one Dropbox folder; invoices go to accounting, contracts go to legal.
Solution: Define classes on PDF4me (e.g. invoice, contract). In Zapier, add a Filter or Paths after Classify Document: if Class Names = invoice, Upload File to /Accounting/Invoices/; if contract, Upload File to /Legal/Contracts/.
Parse by document type (different templates per class)
Problem: Invoices need one parse template; receipts need another. You don't know which until you know the type.
Solution: Classify first, then parse. Add classes on PDF4me (e.g. invoice, receipt). In Zapier: New File in Folder, Classify Document, Paths on Class Names. For invoice, add Parse Document with the invoice template; for receipt, add Parse Document with the receipt template.
Rename files by class for search and filing
Problem: Generic filenames like document.pdf; you want to prefix the class (e.g. invoice_document.pdf, contract_document.pdf).
Solution: Add classes on PDF4me, then in Zapier: New File in Folder, Classify Document, Upload File. Set Specify File Name using Class Names + underscore + original filename. Use 1. File from the trigger for the file content.
What to Do Next
- Set up classes on PDF4me — Open Classify Document, click Edit, add a class (e.g.
pdf4me_invoice) with a Regular Expression or JavaScript expression, then Save Changes. - Get an API key — PDF4me API key dashboard. Use it in Zapier to create your PDF4me connection.
- New to PDF4me + Zapier? — Connect PDF4me to Zapier shows how to create the connection.
- Build the Zap — New File in Folder (Dropbox) → Classify Document (PDF4me). Map File from 1. File and File Name from 1. File Name + 1. File Ext; use Class Names in the next step.
- Full action reference — Classify Document — Zapier for all parameters and output fields.