产生 PDF 从 Word 模板 Make
本指南涵盖的内容
本指南将引导您完成构建过程。 Make 产生以下情况的场景 PDF 来自一份文件 Word 模板和 JSON 使用数据文件 PDF4me 生成文档这套四模块流程会下载您的 .docx 来自模板和数据文件的 Dropbox将它们合并在一起,然后上传最终结果。 PDF 回归云存储,全程自动化,无需编写任何代码。同样的模式也适用于发票、证书、合同、报告以及您目前手动填写的任何其他文档。
开始之前
.docx 文件 <<fieldName>> 动态内容将显示在此处的占位符。下载示例模板,即可在创建自己的模板之前查看预期格式。.json 包含键值对的文件,其中每个键都匹配一个 <<fieldName>> 在模板中添加标签。下载示例数据以验证结构,然后再使用您自己的有效负载。概览
完整版 Make 场景 Word 模板文档生成过程如下:
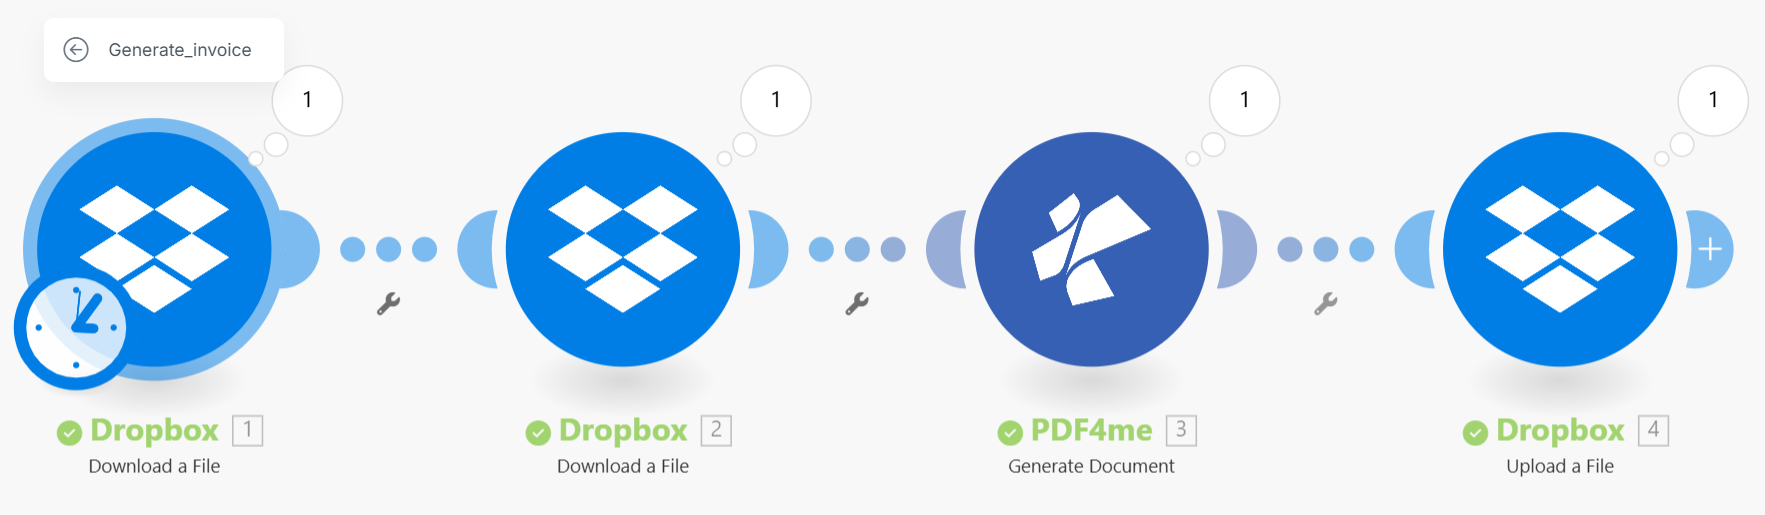
完整流程: 下载模板 → 下载数据 → PDF4me 生成文档 → 上传输出 PDF
四个模块,依次为:
| 步 | 模块 | 目的 |
|---|---|---|
| 1 | Dropbox下载文件 | 取回 .docx Word 模板文件 |
| 2 | Dropbox下载文件 | 取回 .json 数据文件 |
| 3 | PDF4me生成文档 | 将数据合并到模板中,输出 PDF |
| 4 | Dropbox上传文件 | 保存已完成的内容 PDF 输出文件夹 |
第一步:创建您的 Word 模板
使用 PDF4me LINQ 报表引擎 标签语法在你的 Word 文档:
<<fieldName>> → simple text substitution
<<foreach [item in items]>>
 <<[item.name]>> → loop over array items
<</foreach>>
<<if [condition]>>
 content → conditional section
<</if>>
发票模板示例摘录:
Invoice No: <<[invoiceNumber]>>
Date: <<[invoiceDate]:"MMMM dd, yyyy">>
Customer: <<[customerName]>>

<<foreach [line in lineItems]>>
 <<[line.description]>> Qty: <<[line.qty]>> $<<[line.price]:"F2">>
<</foreach>>

Total: $<<[total]:"F2">>
将文件另存为 .docx 并将其上传到您的 Dropbox (或者 Google Drive / OneDrive)在一个文件夹中 Make 例如,可以访问 /pdf4metest/GenerateDocumentFromWord/invoice_template.docx。
匹配 JSON 数据:
{
 "invoiceNumber": "INV-2026-00123",
 "invoiceDate": "2026-05-10",
 "customerName": "Acme Corporation",
 "lineItems": [
 { "description": "PDF Automation Setup", "qty": 1, "price": 1200.00 },
 { "description": "API Integration", "qty": 3, "price": 450.00 }
 ],
 "total": 2550.00
}
有关完整的模板标签参考,请参阅 Word 模板语法指南。
步骤 2:设置两个下载步骤 Make
加两个 Dropbox下载文件 在开始之前,请按照以下步骤说明您的场景 PDF4me 模块。
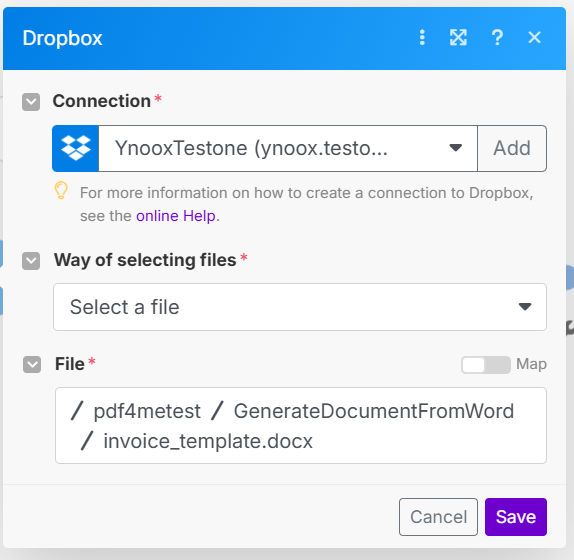
步骤 1(模板): 连接到 Dropbox 并选择 .docx 模板文件。 步骤 2(数据): 对……也做同样的操作。 .json 文件夹中的数据文件。
对于每个 Dropbox 下载步骤:
- 点击 联系 → 选择或添加您的 Dropbox 联系。
- 放 文件选择方式 → 选择文件。
- 浏览到您的文件(例如:
/pdf4metest/GenerateDocumentFromWord/invoice_template.docx对于步骤 1,以及.json步骤 2 的路径)。 - 点击 好的 确认选择。
这 Data 每一步的输出都是你要连接到的二进制文件内容。 PDF4me 模块。
步骤 3:配置 PDF4me 生成文档
添加 PDF4me生成文档 完成两个下载步骤后。
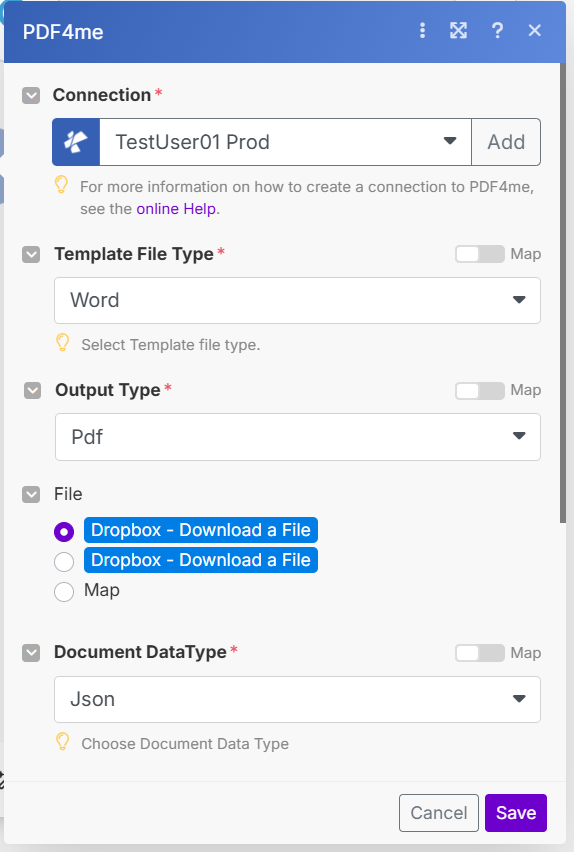
放 模板文件类型 到 Word 和 输出类型 到 Pdf将两者连接起来 Dropbox 步骤如下:模板和数据文件输入 文件。
配置:
| 场地 | 价值 | 笔记 |
|---|---|---|
| 联系 | 你的 PDF4me 联系 | 点击“添加”→粘贴 API 如果是第一次 |
| 模板文件类型 | Word | 与您的匹配 .docx 模板 |
| 输出类型 | 或者 Word / Excel 如有需要 | |
| 文件 | Dropbox下载文件(×2) | 第一行 = 模板,第二行 = 数据文件 |
| 文档数据类型 | Json | 或者 Xml 如果你的数据文件是 XML |
| 文档数据文本 | (如果使用文件,请留空) | 或者粘贴 JSON 直接在这里 |
| 元数据 JSON | (选修的) | 日期格式设置,复选框 HTML 字段 |
该模块输出 文件日期 (已完成) PDF 二进制)和 姓名 (输出文件名):两者均可在下一步中进行映射。
步骤 4:保存输出 PDF
添加一个 Dropbox上传文件 作为最后一个模块的步骤。
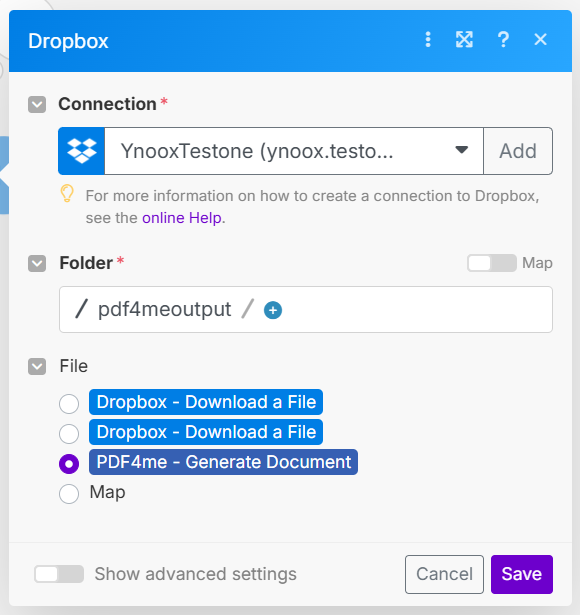
地图 文件日期 从 PDF4me 设置文件内容,并设置目标文件夹和文件名。
配置:
- 文件夹路径 → 你的输出文件夹,例如:
/pdf4metest/GeneratedInvoices/ - 文件名 → 绘制地图
Name输出 PDF4me或者使用动态表达式,例如Invoice_{{timestamp}}.pdf - 文件 (或者 文件内容) → 地图 文件日期 从 PDF4me 生成文档步骤
点击 运行一次 测试完整流程。打开目标文件夹以确认。 PDF 已正确生成并保存。
工作流程示例
现实世界场景变化Common document types you can generate with this same four-step pattern.
- 当有新订单生成时,会触发一个 webhook。 Shopify 或者 WooCommerce。
- 订单有效负载(客户、订单项、总计)被组装成 JSON 在 Make 文本模块。
- Google Drive 下载发票 Word 团队网盘中的模板。
- 生成文档 合并订单 JSON 将内容输入模板并输出一个 PDF。
- Gmail 发送发票 PDF 发送给客户并将副本上传到 SharePoint “发票”库。
- A Typeform 完成调查后,系统会触发包含参与者姓名、课程和日期的场景。
- Dropbox 下载证书 Word 模板。
- 生成文档 填写参与者姓名、课程名称和完成日期,输出类型 Pdf。
- Gmail 发送证书 PDF 对参与者而言。
- 证书上传到 SharePoint 用于合规记录的“认证”库。
- 每周一都会触发一个预定场景,并读取上周的关键绩效指标 (KPI)。 Google Sheets。
- A Make 文本模块将表格数据组装成一个 JSON 与报表模板字段匹配的对象。
- Dropbox 下载报告 Word 模板。
- 生成文档 合并 JSON 在模板中,输出类型 Word 这样团队在分发报告之前仍然可以对其进行编辑。
- 生成的 Word 在上午 9 点站会之前,将文件邮件发送给管理团队。