余白を追加 PDF で Make
このモジュールの機能
PDF4me余白を追加する PDF すべてのページの端に余白を追加 PDF そして、ページサイズを拡大した新しいドキュメントを返します。左右上下の各辺をミリメートル単位で個別に制御できます。これを使用して、左側に綴じ込みスペース、右側に注釈スペース、上部にヘッダーの余白、下部にフッターの余白を作成できます。元のコンテンツは移動または再配置されません。余白は、既存のコンテンツ境界の外側に追加された純粋な空白です。
関連ブログ記事
この機能に関するブログ記事はまだありません。近日公開予定です。
その間、PDF4me ブログを閲覧して、あらゆるプラットフォームのチュートリアルやワークフローをご覧ください。
ブログをご覧ください →
認証 API リクエスト
毎 PDF4me モジュール Make 有効な 繋がり. 作成または選択して、 PDF4me API シナリオがマージン要求を安全に認証できるようにするためのキー。
見逃してはならない重要な事実
余白を増やすとページサイズが大きくなります
追加する余白はすべて、その方向にページを拡大します。左余白を 25mm にするとページは 25mm 広くなり、上余白を 15mm にするとページは 15mm 高くなります。下流のワークフローで用紙サイズが固定されている場合、プリンタードライバー、 PDF/A バリデーターまたはフォームは、シナリオを実行する前に、より大きな寸法を考慮に入れます。
変更しない場合は、任意のエッジを0に設定してください。
余白の設定は4つのフィールドすべて必須ですが、拡張したくない辺には0を入力できます。左側にのみ綴じ込み余白を追加するには、「左余白」に25、他の3つのフィールドに0を入力します。ページは左側のみ拡張され、他の3辺は元の寸法のままです。
コンテンツは移動も再配置もされません
元のコンテンツ境界内の既存のテキスト、画像、レイアウトは変更されません。このモジュールは境界の外側に空白を追加するだけで、コンテンツを内側に押し込んだり、ドキュメントの書式を変更したりすることはありません。つまり、表、段落区切り、画像の位置は元のソースと同じ場所にそのまま残ります。 PDF。
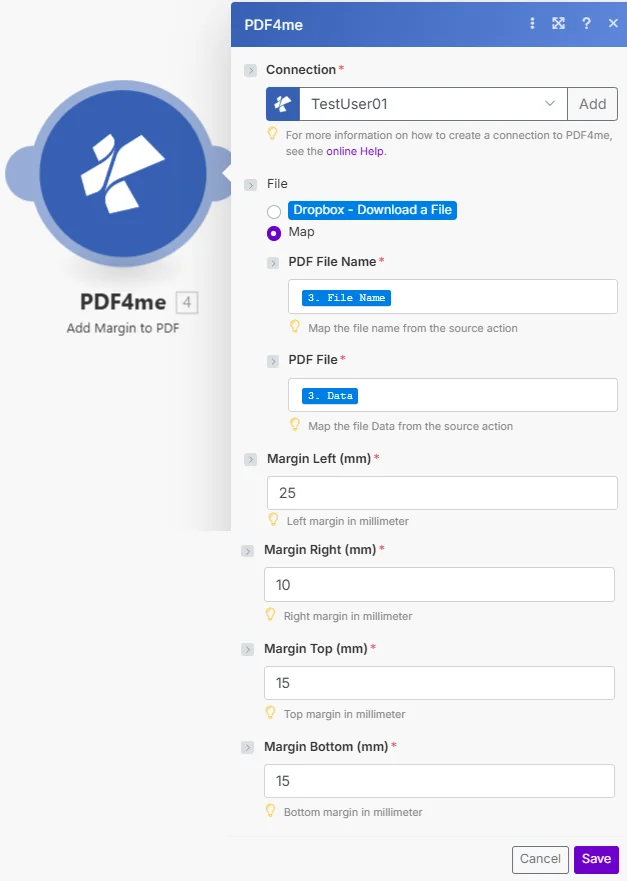
余白欄は4つすべて必須です。余白を広げたくない辺には0を入力してください。余白の単位はミリメートルです。左余白は一般的な綴じ込み余白で、上下15mmは印刷スペースを確保するための目安です。
パラメータ
必須: 繋がり、 PDF ファイル名、 PDF ファイル、左余白、右余白、上余白、下余白はすべて指定する必要があります。拡張したくないエッジには 0 を入力してください。すべての余白値は整数です。 ミリメートル(mm)。
| パラメータ | 必須 | その機能 | 例 |
|---|---|---|---|
| Connection | Required | PDF4me API connection. Click Add and paste your API key if connecting for the first time. | My PDF4me connection |
| File | Required | How the source PDF reaches the module. The radio lists your connected storage actions (for example Dropbox - Download a File) and Map. Choose Map to wire the fields below from earlier modules: PDF File Name and PDF File only appear once Map is selected. | Map |
| PDF File Name | Required | Filename of the source PDF including .pdf extension. Map from the prior module's file name output. | report.pdf |
| PDF File | Required | Binary content of the source PDF. Map from the prior module's data output: Dropbox, Google Drive, HTTP, or email attachment. | 1. Data |
| Margin Left (mm) | Required | White space added to the left edge in millimeters. Expands page width by this amount. Enter 0 for no left margin. Defaults to 10. Typical binding margin: 20-30mm. | 25 |
| Margin Right (mm) | Required | White space added to the right edge in millimeters. Expands page width by this amount. Enter 0 for no right margin. Defaults to 10. Typical margin: 10-15mm. | 10 |
| Margin Top (mm) | Required | White space added to the top edge in millimeters. Expands page height by this amount. Enter 0 for no top margin. Defaults to 10. Header clearance: 15-20mm. | 15 |
| Margin Bottom (mm) | Required | White space added to the bottom edge in millimeters. Expands page height by this amount. Enter 0 for no bottom margin. Defaults to 10. Footer clearance: 15-20mm. | 15 |
出力
このモジュールは2つのフィールドを返します。どちらのフィールドも、シナリオ内の後続のモジュールでマッピングに使用できます。
| 分野 | タイプ | 内容物 |
|---|---|---|
| Name | File name | File name of the resulting PDF. Map it together with Document into the next module, for example to upload or email the file. |
| Document | File (binary data) | Content (binary data) of the resulting PDF with the expanded margins. Map it together with Name into the next module. |
クイックセットアップ
- 追加 PDF4me → 余白を追加 PDF あなたの Make シナリオ。
- 選択 繋がり (またはクリック) 追加 あなたと一緒に作成する PDF4me API 鍵)。
- セット ファイル に 地図 そして接続する PDF ファイル名 そして PDF ファイル 前のモジュールから。
- ミリメートル単位で整数値を入力してください 左余白、 右余白、 マージントップ、 そして マージンボトム。 入力
0拡張したくない辺については、すべてこれを使用します。 - クリック 保存 そしてシナリオを実行します。出力 書類 フィールドにはマージン拡張が含まれています PDF: ストレージアップロード、メール送信、または印刷モジュールにパイプで接続します。
ワークフローの例
ワークフローの例Common Make scenario patterns using Add Margin to PDF.
印刷用レポートの綴じ目余白
- 毎月末日に、スケジュールされたトリガーが作動します。
- Google Drive 月次レポートをダウンロードする PDF。
- 余白を追加 PDF 左余白25、右余白10、上余白15、下余白15で実行され、左側に綴じ目余白が作成されます。
- 拡張された PDF 「印刷準備完了」フォルダにアップロードします SharePoint。
- 印刷チームに、今月のレポートの製本準備が完了したことを知らせるメールが届く。
注釈スペース付きのレビュー用見本
- 新しいファイルが Dropbox 「レビュー用」フォルダが、シナリオをトリガーします。
- 余白を追加 PDF 四辺すべてに30mmずつ追加することで、レビュー担当者はあらゆる面に広い注釈スペースを確保できます。
- 拡張された PDF 「レビュー用見本」フォルダにアップロードされます。
- Gmail 査読用原稿を締め切り日を記載したメモを添えて、担当査読者に送付する。
メモ欄付きのトレーニングワークブック
- A Google Sheets 行が新しいトレーニングセッションで更新され、シナリオがトリガーされます。
- Google Drive トレーニングスライドをダウンロードする PDF。
- 余白を追加 PDF 右端に40mm、上下左右に15mmを追加することで、右側に幅広のメモ欄を作成します。
- ワークブック PDF トレーニングポータルにアップロードされ、登録済みの参加者全員にメールで送信されます。
よくある質問
関連モジュール
サイズ変更 PDF
変化 PDF ページサイズをA4、レター、またはカスタムサイズに設定できます。余白を広げたページを、目的の用紙サイズに合わせてサイズ変更する必要がある場合に便利です。
変換する HTML に PDF
生成する PDF から HTML 内容を印刷した後、後続の手順で余白を追加して、製本または印刷配布の準備を整えます。
バーコードを追加する PDF
バーコードを配置するか、 QR code 新しく作成された余白領域で、「余白を追加」と「バーコードを追加」を組み合わせて、白いスペースに追跡コードを刻印します。