Add Text Watermark
Stamp a line of text across the pages of a PDF. The action takes one PDF as input and returns the same PDF with your text drawn onto the pages you choose, then passes it to the next step. You set the wording, where it sits, the font, the color, the opacity, and the angle, so the stamp can sit quietly in a corner or run large and diagonal across the page.
Use it to mark drafts and internal copies with text such as CONFIDENTIAL or DO NOT DISTRIBUTE, to brand outgoing documents with a company name, or to date-stamp files as they move through an approval process. Because the stamp is applied to every file the workflow picks up, you can watermark hundreds of documents without opening any of them.
Configuration
Configure the Add Text Watermark step in the workflow builder:
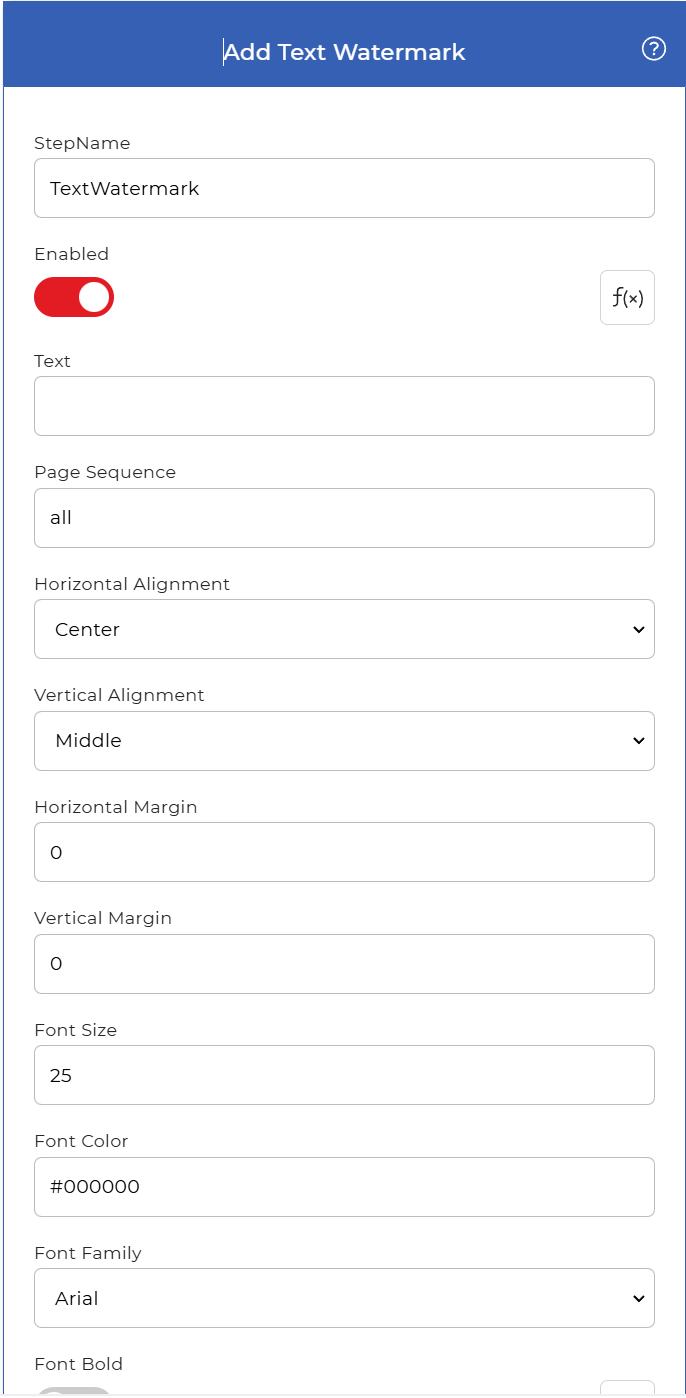
Action overview
| Input | Single PDF document |
| Output | The same PDF with the text watermark applied |
Properties
Text
- Type: String
- Required: Yes
The words drawn onto the page, for example DRAFT, CONFIDENTIAL, or a company name. Enter the exact text you want to appear on every selected page.
Page Sequence
- Type: String
- Default: all
The pages that receive the watermark. Enter a page number (1, 2, 3, etc.) or a keyword: first, last, or all. Use all to stamp the whole document, or name a specific page when only part of the file needs the mark.
Horizontal Alignment
- Type: Select
- Default: Center
Sets the left-to-right position of the text on the page. The allowed values are:
- Left: left edge of the page
- Center: equal distance from the left and right edge of the page
- Right: right edge of the page
Vertical Alignment
- Type: Select
- Default: Middle
Sets the top-to-bottom position of the text on the page. The allowed values are:
- Top: top edge of the page
- Middle: equal distance from the top and bottom edge of the page
- Bottom: bottom edge of the page
Horizontal Margin
- Type: Integer
- Required: No
- Default: 0
Horizontal gap in millimeters (mm) between the text and the page edge. If horizontal alignment is Left, it sets the gap from the left edge. If Right, it sets the gap from the right edge. If Center, this field is ignored. Raise it to push the stamp inward from the edge.
Vertical Margin
- Type: Integer
- Required: No
- Default: 0
Vertical gap in millimeters (mm) between the text and the page edge. If vertical alignment is Top, it sets the gap from the top edge. If Bottom, it sets the gap from the bottom edge. If Middle, this field is ignored.
Font Size
- Type: Integer
- Required: No
- Default: 25
The size of the watermark text in points. Increase it for a large, page-spanning stamp, or lower it for a small mark in a corner.
Font Color
- Type: String
- Default: #000000
The color of the text, given as an HTML color code or hexadecimal triplet. Example: #ADD8E6.
Font Family
- Type: String
- Default: Arial
The typeface used for the watermark text. Allowed values:
- Arial
- Verdana
- Courier
- Comic Sans
- Times New Roman
Font Bold
- Type: Select
- Required: No
Draws the watermark text in bold. Allowed values are:
- Yes
- No
Font Italics
- Type: Select
- Required: No
Slants the watermark text. Allowed values are:
- Yes
- No
Font Underline
- Type: Select
- Required: No
Underlines the watermark text. Allowed values are:
- Yes
- No
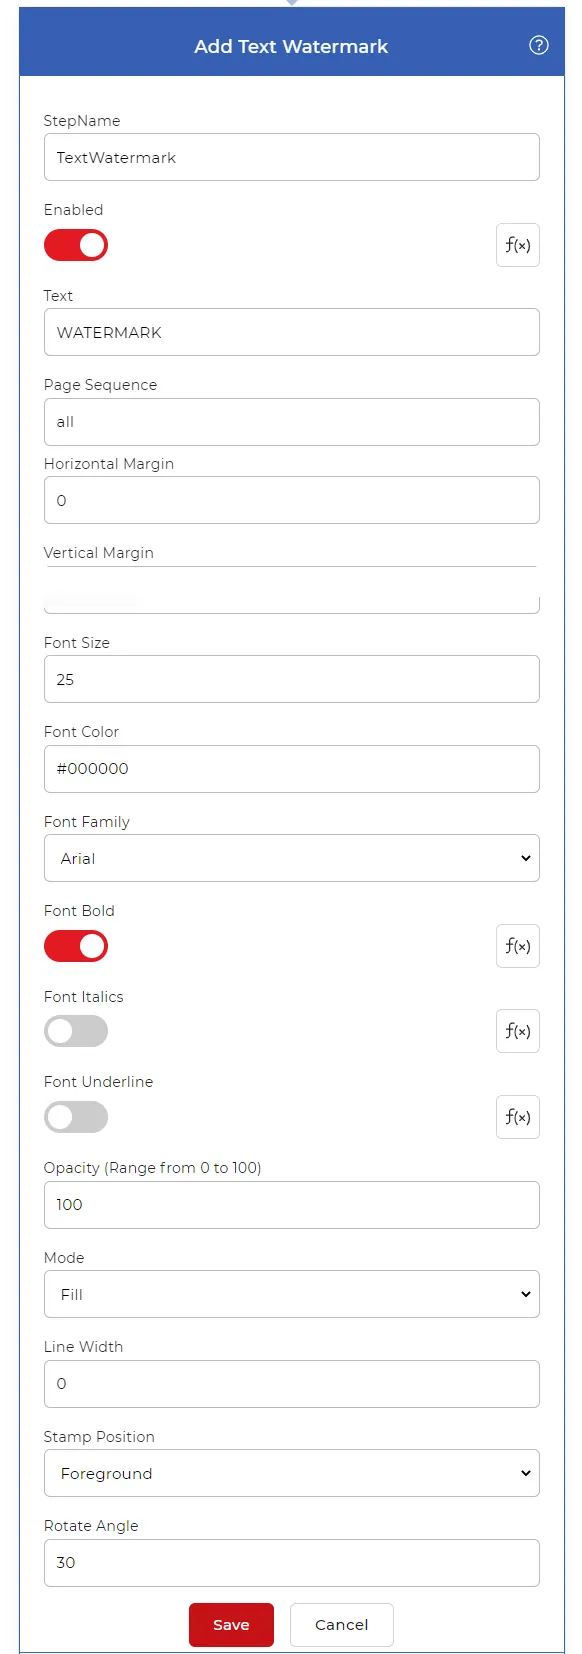
Opacity (0 to 100)
- Type: Integer
- Required: Yes
How solid or see-through the text appears, from 0 to 100. A value of 0 is fully transparent and 100 is fully opaque. Use a low value for a faint background mark that keeps the content readable, and a high value for a solid stamp.
Mode
- Type: Select
- Required: Yes
Sets how the characters are drawn. Allowed values are:
- Fill: solid, filled-in letters
- Stroke: outlined letters with an unfilled center
Line Width
- Type: Integer
- Required: No
The thickness, in points, of the line used to draw the text outline. It applies when the text is stroked rather than filled.
Stamp Position
- Type: Select
- Required: Yes
Sets how the watermark layers with the page content. Allowed values are:
- Annotation: added as an annotation object over the page
- Foreground: drawn on top of the page content
- Background: drawn behind the page content, so text and images sit over it
Rotate Angle
- Type: Float
- Required: No
The angle, in degrees, to rotate the text. Use 0 for horizontal text, or a value such as 45 for a diagonal stamp across the page.
How to add a text watermark using Workflows
A watermark is an identifying text or pattern laid over a document to mark it and deter unauthorized copying. PDF4me Workflows can stamp one on every file automatically. Here is a sample workflow that applies a text watermark to each incoming PDF.
Create a new workflow
Open the PDF4me Workflows dashboard and select Create Workflow to start a new automation.

Add a trigger
Add a trigger to kick-start your automation. PDF4me Workflows support Dropbox and Google Drive triggers, so choose whichever suits your workflow. Configure the connection and select the folder where the input files are expected.

Add the Add Text Watermark action
Add and configure the Add Text Watermark action with the required parameters. Set the watermark text, its position, font, color, opacity, rotation, and the other properties described above to control the look and style of your stamp.
Add a Save to Dropbox action
Once the watermark is applied, save the output to your storage. For this use case, add and configure a Save to Dropbox action.

Now every time a new PDF is detected in the configured source folder, the automation is triggered. The uploaded document is processed with the configured action and the watermarked output is saved within seconds.
Try it in PDF4me Workflows
Open the Workflows dashboard, create a workflow, and add the Add Text Watermark step to run this on your own documents.