AI Document Parser using Classify
What this guide covers
AI Document Parser. Classify lets one Analyzer handle several document variants in a single call. You define an Analyzer Id, then add one Schema per variant (Client ABC, Client XYZ, generic invoice, generic purchase order). Each Schema carries a Classification Name, a Classification Prompt in natural language, and a Document Schema describing the fields to extract. At runtime the AI matches the incoming PDF against every Schema's Classification Prompt, picks the best fit, and returns both the matched Classification Name and the extracted fields. The same Analyzer Id works from the REST API and every supported automation platform.
Authenticating Your Setup
Classify Analyzers are created in the PDF4me developer dashboard. Sign in with your account, then create or copy an API key for the AI Parser API calls that reference the Analyzer you build here.
- Analyzer list (Steps 1, 2):
https://developer.pdf4me.com/dashboard/#/ai-document-parser/ - Analyzer detail (Steps 3, 4, 5):
https://developer.pdf4me.com/ai-document-parser/?id=<analyzer-guid>
Important Facts You Should Not Miss
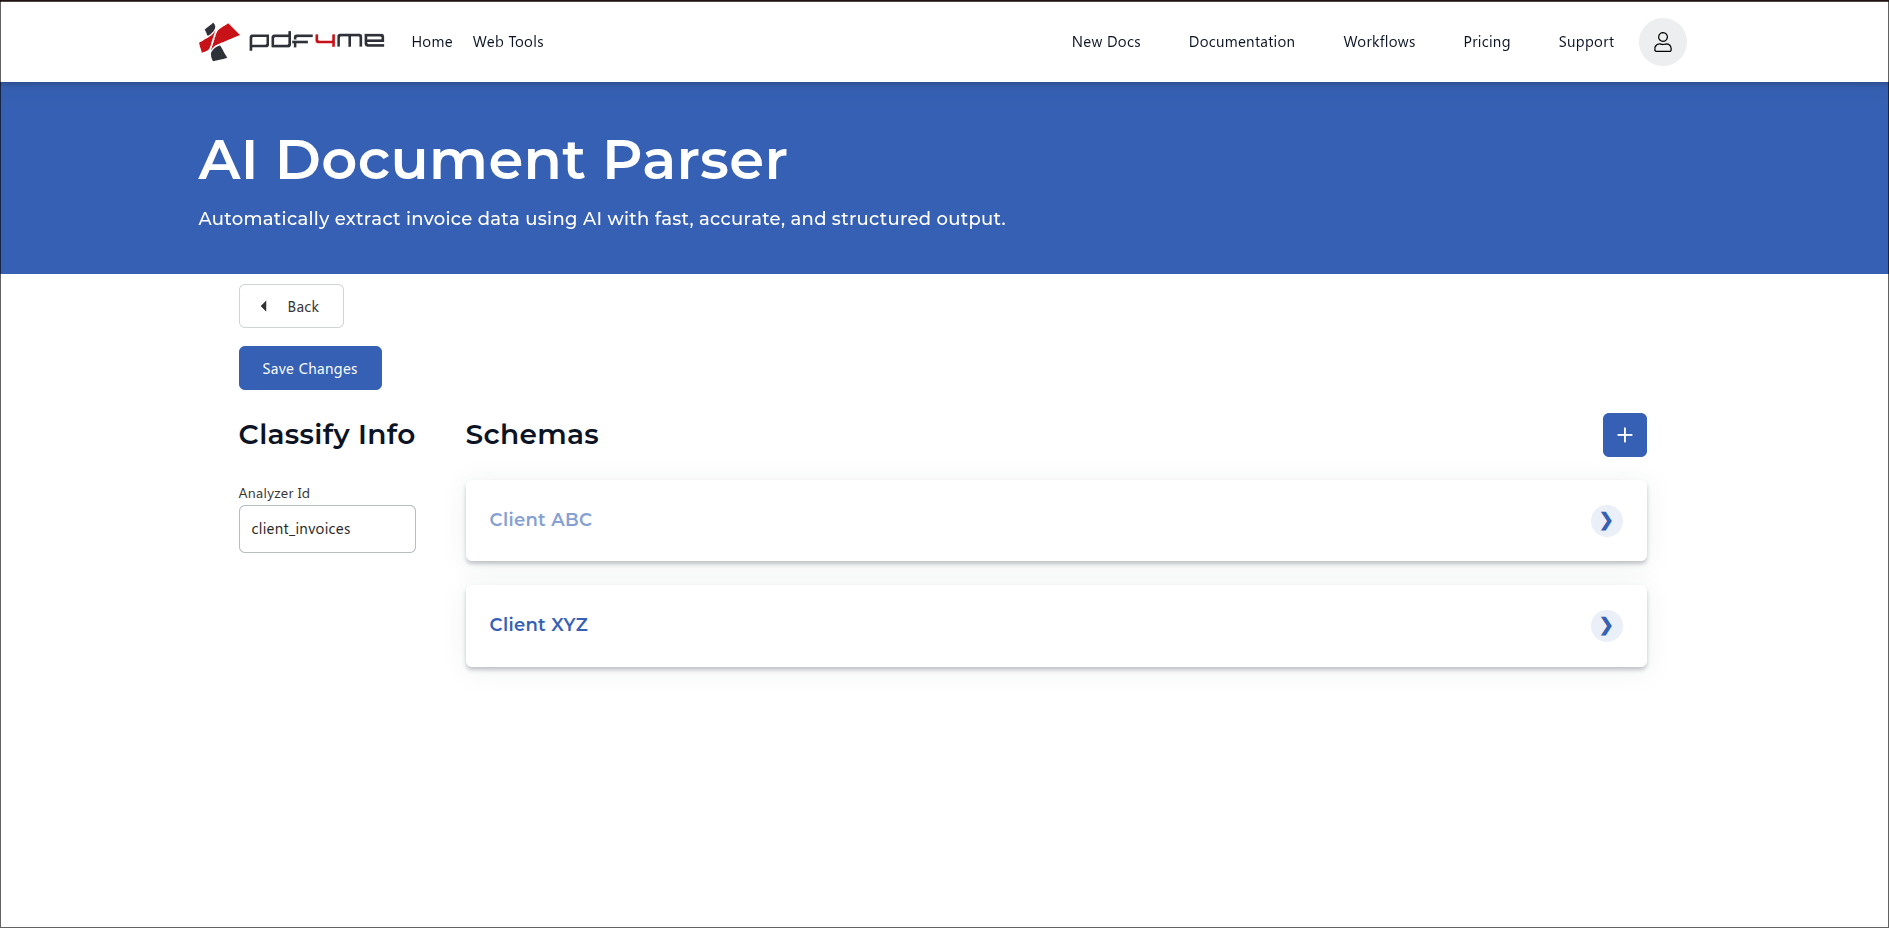
Step 1: Open AI Document Parser in the dashboard
- Sign in at dev.pdf4me.com.
- From the dashboard sidebar, click AI Document Parser.
- The list page shows every existing Analyzer with three columns: Analyzer Id, Analyzer Type (Parse or Classify), and Actions.
- Click the blue + Add button to start a new Analyzer.
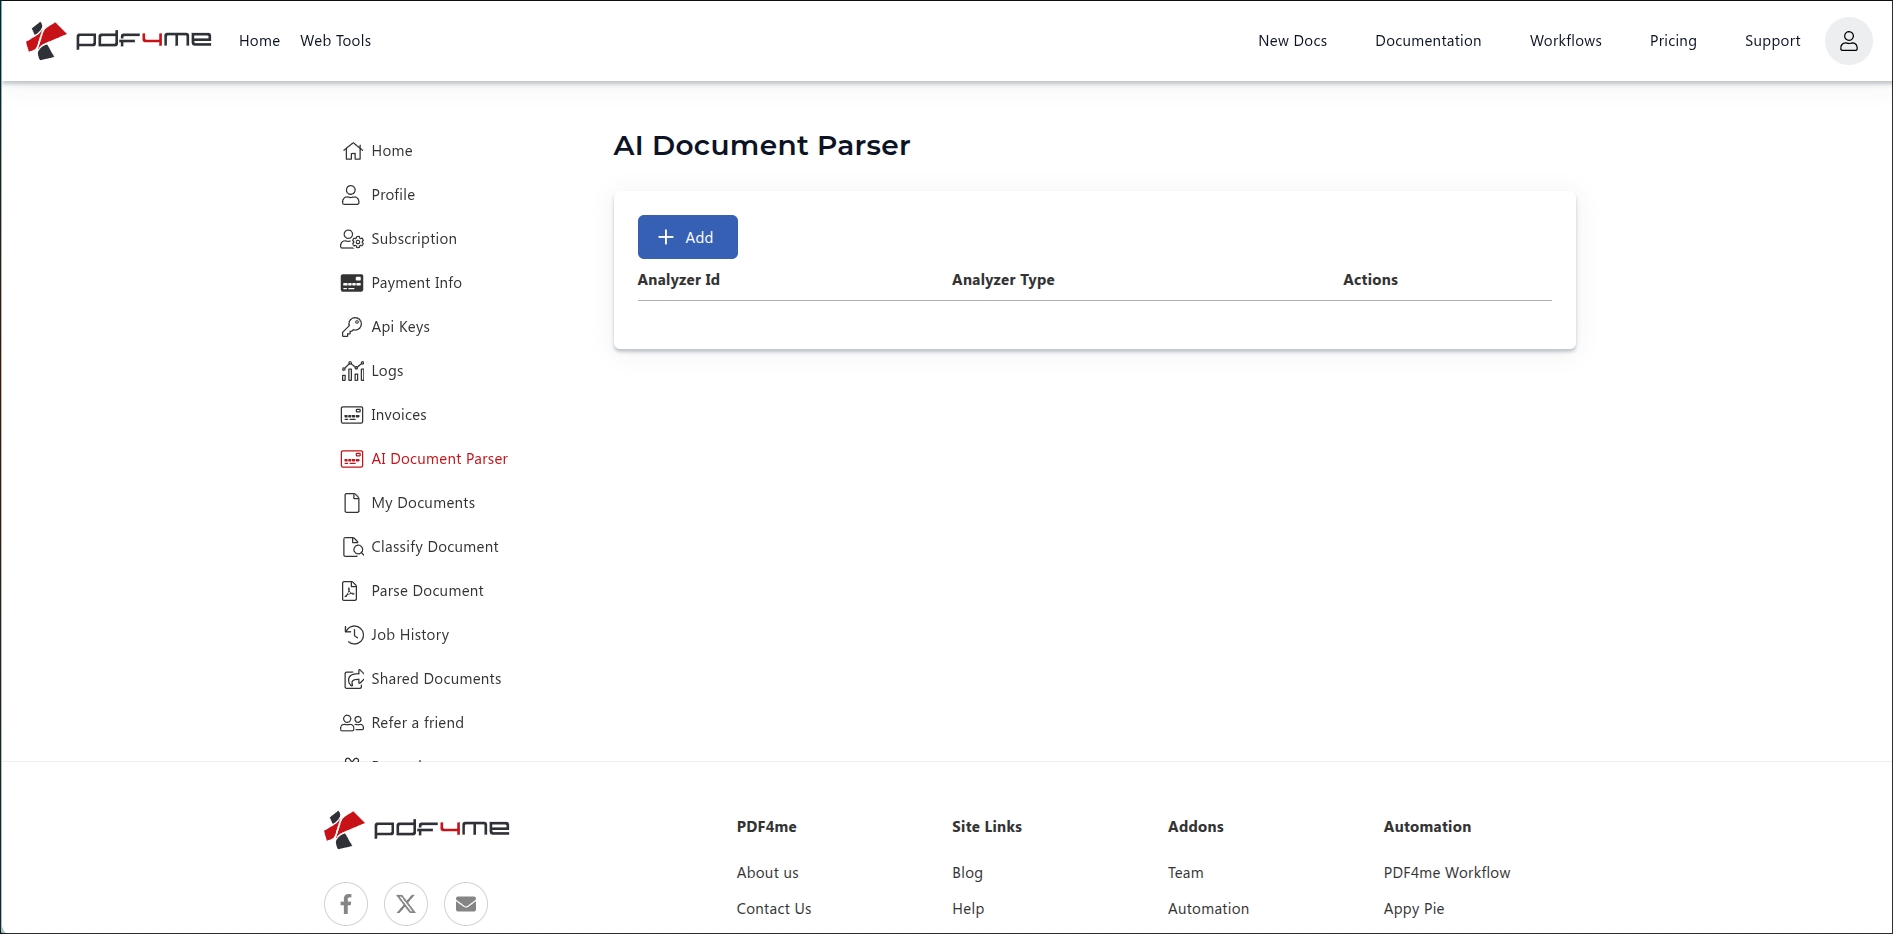
AI Document Parser list view. Click + Add to start a new Analyzer.
Step 2: Create a Classify Analyzer
A new row appears with three controls:
- Analyzer Id input. type any clear identifier you will remember, for example
client_invoices,Vendor Documents, orincoming-orders. There is no naming format restriction. snake_case, camelCase, kebab-case, plain words with spaces, all work the same. The example below usesclient_invoices. - Analyzer Type dropdown. pick Classify (this guide) or Parse (see the Parse guide).
- Save / Cancel buttons. Save creates the Analyzer; Cancel discards the row.
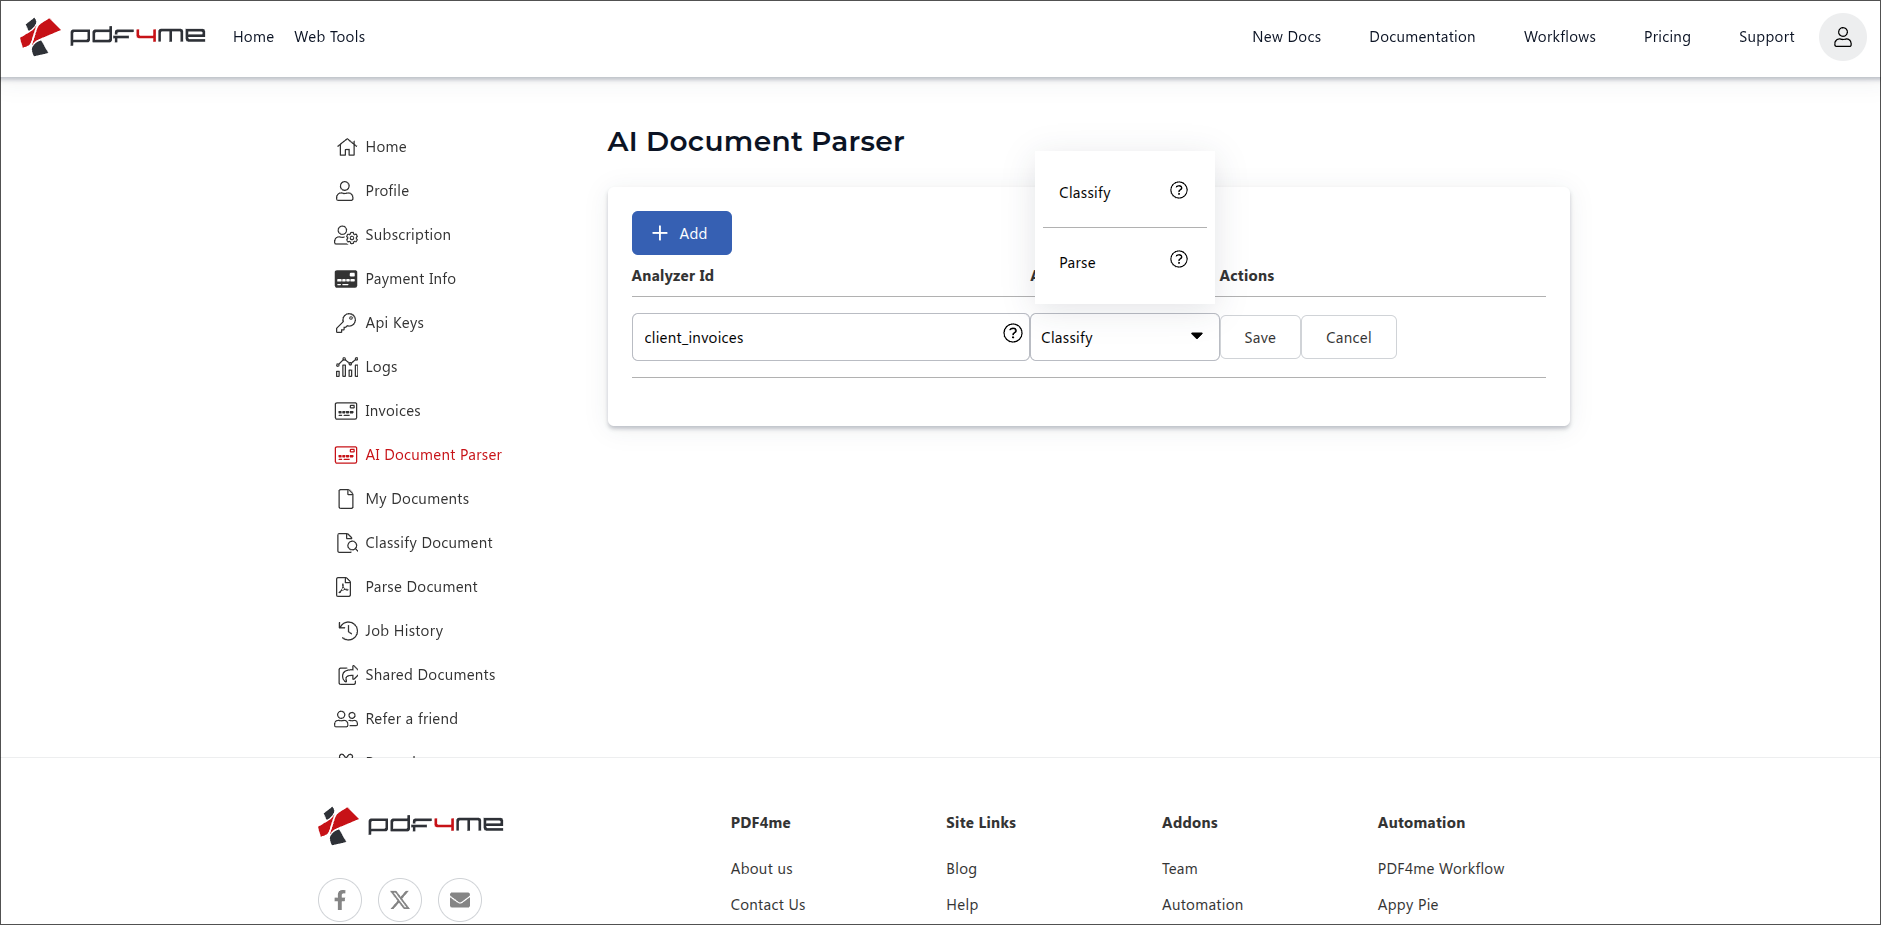
Add row: enter the Analyzer Id (here client_invoices), pick Classify, then Save.
Step 3: Open the Analyzer and add the first Schema
Click the new row to open the detail page. The URL pattern is:
https://developer.pdf4me.com/ai-document-parser/?id=<your-analyzer-guid>
The dashboard issues a GUID per Analyzer the first time you open it. Bookmark this URL to jump straight back to the same Classify Analyzer next time.
The detail page shows:
- Classify Info (left). shows the Analyzer Id you typed in Step 2 (here
client_invoices). This panel is read-only. - Schemas (right). empty by default. Each Schema is one document variant. Click the + button in the top-right to add the first Schema.
- Save Changes (top-left). persists every edit you make on this page.
- Back. returns to the Analyzer list.
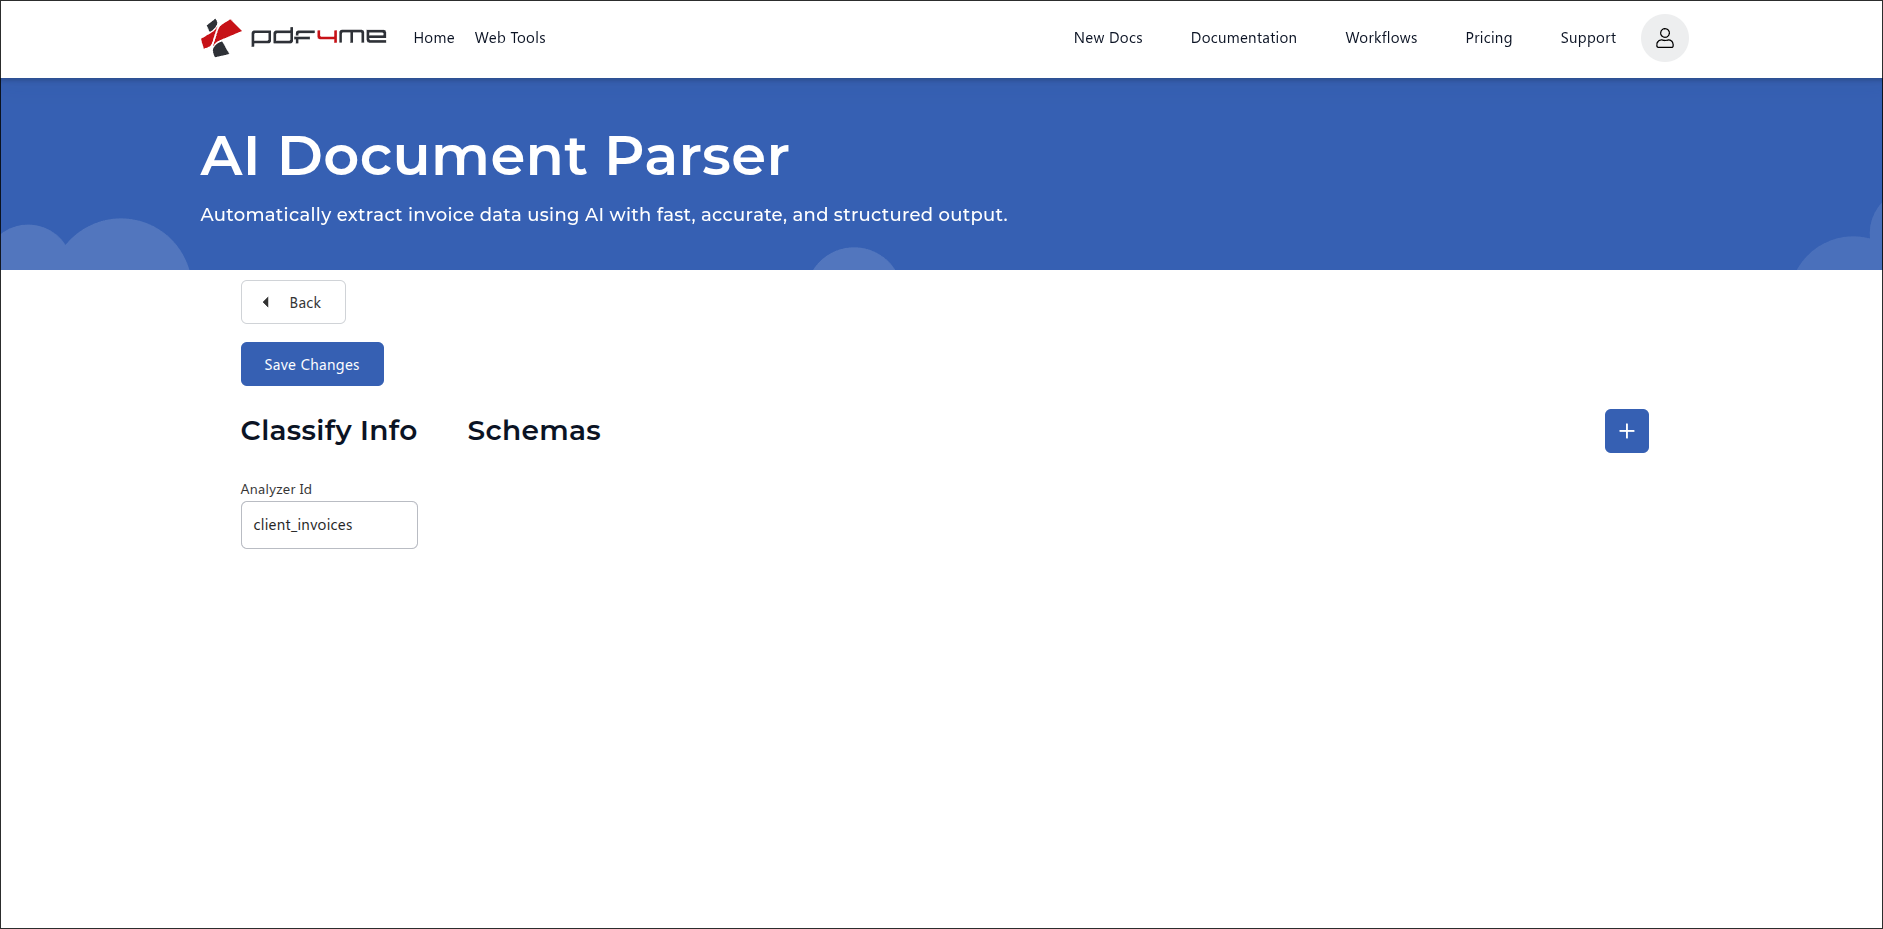
Detail page. Classify Info on the left holds the Analyzer Id. Click the blue + button to add a Schema.
Step 4: Fill Classification Name, Prompt, and Document Schema
Each Schema is one document variant the Analyzer must handle. Every Schema has three required inputs and a familiar quick-fill row at the bottom.
Schema fields (required)
| Field | Purpose | Example |
|---|---|---|
| Classification Name | The label returned by the API when this Schema matches. Use a short, business-friendly name. | Client ABC |
| Classification Prompt | Natural-language description of how to recognise this variant. Mention company name, email, layout cues, distinguishing phrases. This is what the AI uses to route. | The invoice has the company name ABC at the top, followed by the contact email [email protected]. |
| Document Schema | JSON object with a description and a fields array. Each field has fieldName, fieldType, and fieldDescription, plus an optional fieldMethod such as generate for derived values. | { "description": "Extract invoice detail for ABC invoices", "fields": [ ... ] } |
Example Schema: Client ABC
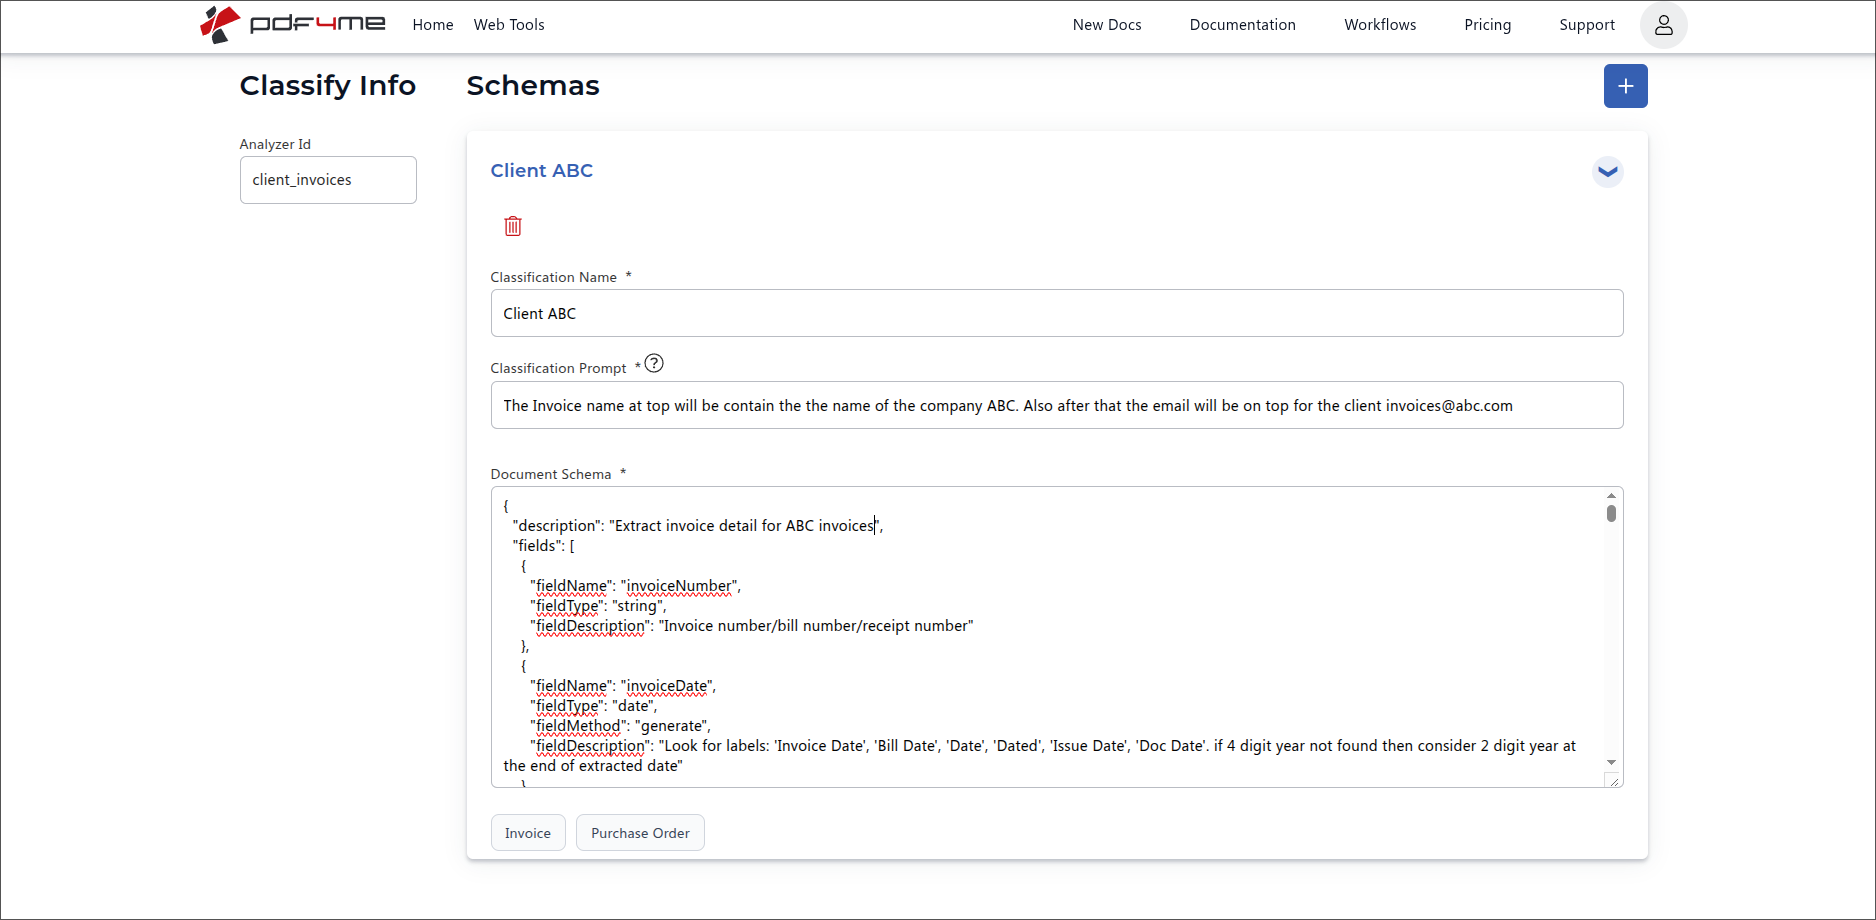
First Schema. Classification Name, Classification Prompt, and Document Schema together describe one document variant.
{
  "description": "Extract invoice detail for ABC invoices",
  "fields": [
    {
      "fieldName": "invoiceNumber",
      "fieldType": "string",
      "fieldDescription": "Invoice number / bill number / receipt number"
    },
    {
      "fieldName": "invoiceDate",
      "fieldType": "date",
      "fieldMethod": "generate",
      "fieldDescription": "Look for labels: 'Invoice Date', 'Bill Date', 'Date', 'Dated', 'Issue Date', 'Doc Date'. If 4-digit year not found then consider 2-digit year at the end of extracted date."
    }
  ]
}
The Classification Prompt for Client ABC is the natural-language hint that makes the AI route to this Schema:
"The invoice has the company name ABC at the top, followed by the contact email
[email protected]."
Step 5: Add more Schemas and Save Changes
Click the blue + button again to add a Schema for the next variant. Each new Schema gets its own Classification Name, Classification Prompt, and Document Schema. The fields can differ entirely between Schemas. Client ABC may not have a customer reference column while Client XYZ does.
Example second Schema: Client XYZ
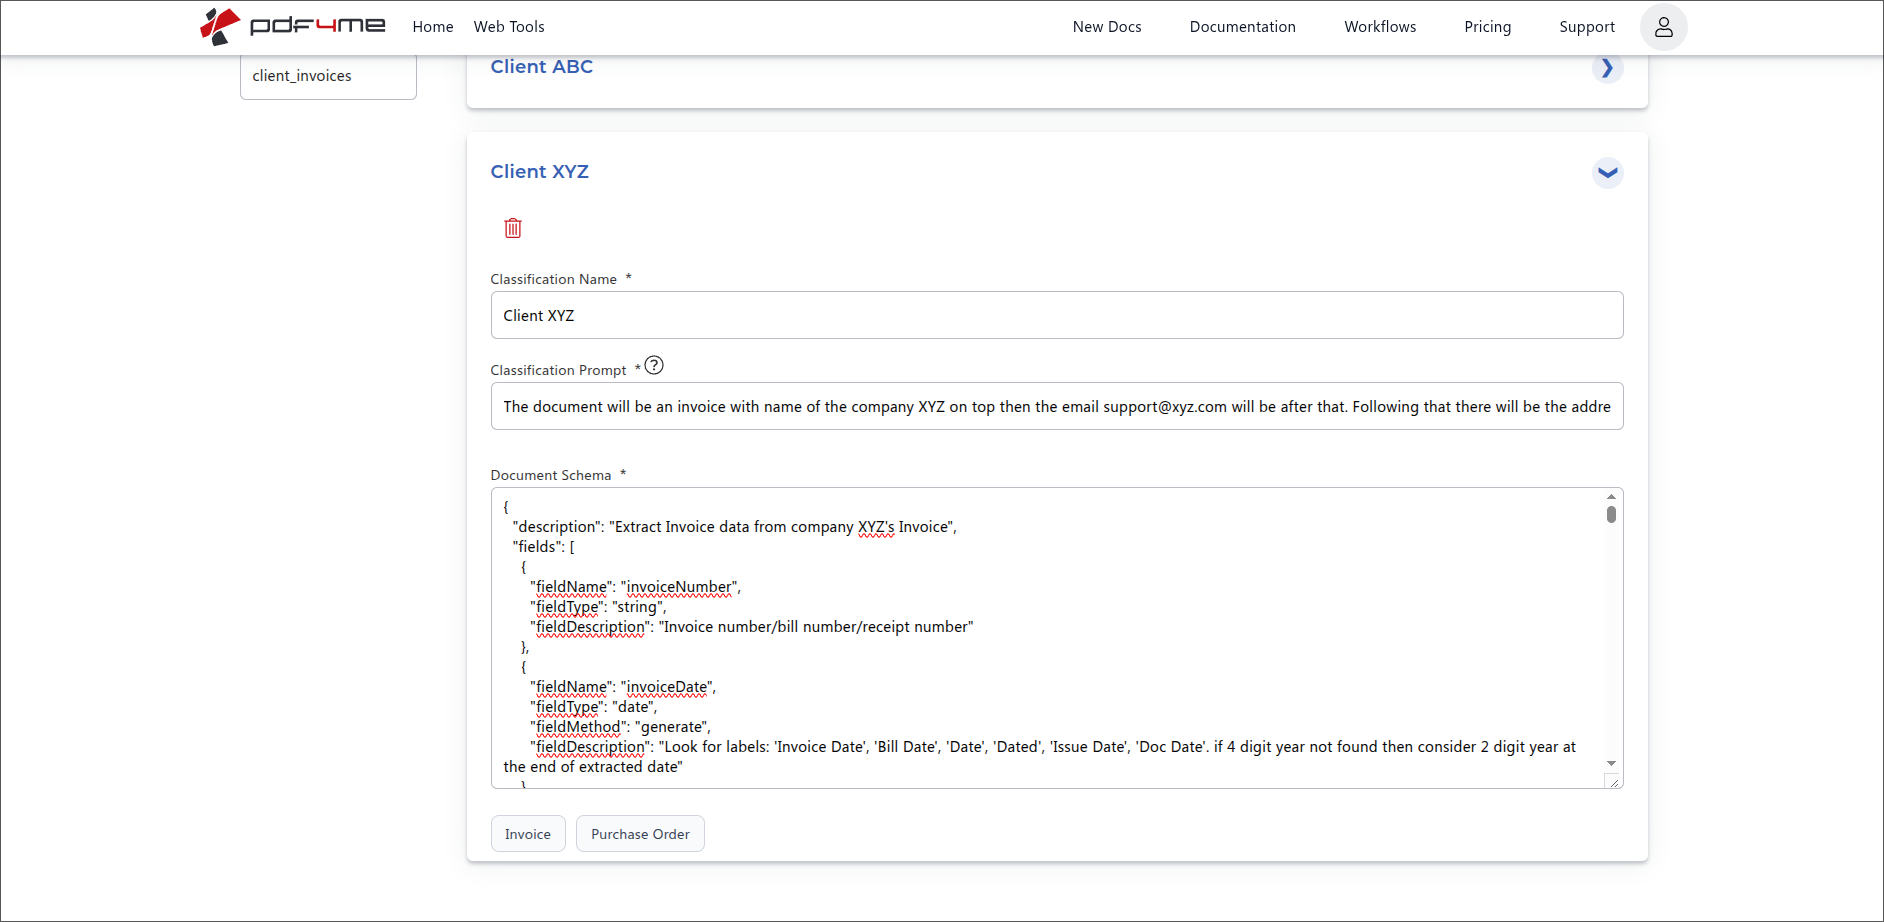
Second Schema for the same Analyzer. Both Schemas now live under client_invoices.
{
  "description": "Extract Invoice data from company XYZ's Invoice",
  "fields": [
    {
      "fieldName": "invoiceNumber",
      "fieldType": "string",
      "fieldDescription": "Invoice number / bill number / receipt number"
    },
    {
      "fieldName": "invoiceDate",
      "fieldType": "date",
      "fieldMethod": "generate",
      "fieldDescription": "Look for labels: 'Invoice Date', 'Bill Date', 'Date', 'Dated', 'Issue Date', 'Doc Date'. If 4-digit year not found then consider 2-digit year at the end of extracted date."
    }
  ]
}
The Schemas list collapses after you Save
Once both Schemas are in, the list shows each one as a collapsible card with the Classification Name on the left and a chevron to expand on the right. Click a card to edit it again later.
Both Schemas saved. Click any card to expand and edit; use + to add more variants.
Click Save Changes at the top-left to persist every Schema you added. The Analyzer is now live and ready to receive PDFs.
Field-level options inside Document Schema
| Attribute | Required? | What it does |
|---|---|---|
fieldName | Required | The name of the field and how it will appear in the response JSON. |
fieldType | Required | The type of data to extract. One of string, number, date, or table. |
fieldDescription | Required | Natural-language description of what needs to be extracted and where to find it. Include alternate labels and example formats so the AI matches correctly. |
fieldMethod | Optional (default extract) | How the AI fills the value. extract takes the value verbatim from the document. generate tells the AI to derive or normalise it (useful for dates, computed totals, or cleaned-up IDs). Omit for default extract behaviour. |
fields | Required when fieldType is table | Nested array describing the columns of the table. Each entry takes the same attributes as a top-level field (fieldName, fieldType, fieldDescription, fieldMethod). Cannot itself be table. |
Schema with a table field (nested rows)
Use fieldType: "table" when a Schema needs to extract repeated rows such as invoice line items. Each table field carries its own nested fields array describing the columns.
{
  "description": "Invoice data extractor",
  "fields": [
    {
      "fieldName": "invoiceNumber",
      "fieldType": "string",
      "fieldDescription": "Invoice number / bill number / receipt number"
    },
    {
      "fieldName": "invoiceDate",
      "fieldType": "date",
      "fieldDescription": "Look for labels: 'Invoice Date', 'Bill Date', 'Date', 'Dated', 'Issue Date', 'Doc Date'. If 4 digit year not found then consider 2 digit year at the end of extracted date.",
      "fieldMethod": "generate"
    },
    {
      "fieldName": "lineItems",
      "fieldType": "table",
      "fieldDescription": "All product / service rows from the invoice table. Be careful, sometimes a row can be part of the next item like when description goes over one line, but it's of a single item.",
      "fields": [
        {
          "fieldName": "itemNumber",
          "fieldType": "string",
          "fieldDescription": "Product number, product id number or product code"
        },
        {
          "fieldName": "hsnCode",
          "fieldType": "string",
          "fieldDescription": "HSN / SAC code (4 to 8 digit)"
        }
      ]
    }
  ]
}
Quick-fill buttons (use as a starting point)
The Schema editor offers Invoice and Purchase Order preset buttons at the bottom of the Document Schema card. Use them as a starting point only. Click one to populate a typical schema for that document family, then tweak field names, types, methods, and descriptions to match the specific variant you are configuring. The presets are scaffolding, not the final shape.
Use the Classify Analyzer in API or automation calls
Once saved, the same Analyzer Id runs anywhere by reference. You do not need to recreate Schemas on each platform.
| Field | Source | Purpose |
|---|---|---|
AnalyzerId | The string you typed in Step 2 (client_invoices) | Stable identifier for the Classify Analyzer. |
docName | Source PDF filename | Used for tracking and error messages. |
docContent | Source PDF encoded as Base64 | The document to classify and extract from. |
async | false for synchronous, true for polling | Controls response delivery. |
Example REST request body:
{
  "docName": "incoming_invoice.pdf",
  "docContent": "BASE64_ENCODED_PDF_CONTENT",
  "AnalyzerId": "client_invoices",
  "async": false
}
The response carries the matched Classification Name plus the fields defined in that Schema's Document Schema. A document recognised as Client ABC returns the Client ABC fields; a document recognised as Client XYZ returns the Client XYZ fields. One call, both decisions.
Common workflows
Typical Classify Analyzer patternsHow a Classify Analyzer with multiple Schemas runs in production.
- Vendor invoices from Client ABC, Client XYZ, and a handful of others arrive in a single mailbox.
- Make, Zapier, Power Automate, or n8n calls AI Parser with
AnalyzerId: client_invoices. - The response carries the Classification Name (Client ABC, Client XYZ, etc.) and the extracted fields.
- A switch step routes each result to the matching ERP customer record using the Classification Name; the extracted fields populate the invoice record directly.
- A new vendor sends an invoice with a different layout for the first time.
- Operations open the existing
client_invoicesAnalyzer in the dashboard and click +. - A new Schema is added with a Classification Name (the vendor's name), a Classification Prompt describing the layout, and a Document Schema for the fields that matter.
- The next inbound PDF is routed to the new Schema automatically. No automation rewiring needed.
- One Analyzer covers invoices, purchase orders, and credit notes.
- Each Schema's Classification Prompt describes the distinguishing markers ("contains Bill To and a payable total" vs. "contains a PO number and a Ship To address").
- The Document Schema per Schema extracts the fields relevant to that document type.
- Downstream routing branches on the Classification Name; each branch writes to the matching system.
Schema best practices for Classify
- One Schema per stable document variant. Two vendors with very different layouts should be two Schemas, not one with overlapping rules.
- The Classification Prompt is your routing rule. Write it in plain English and include concrete markers (company name, email, distinctive phrases, layout cues).
- Keep the Classification Name short, business-friendly, and stable. It is what your downstream routing branches on.
- Use the Invoice and Purchase Order quick-fill buttons as starting points, then tighten field descriptions for each variant.
- Add
fieldMethod: "generate"to dates, computed totals, or fields where the AI should normalize the value instead of copying it verbatim. - Test each Schema against a real sample before going live: an obvious Client ABC invoice should always route to the Client ABC Schema, not Client XYZ.
- Click Save Changes after every editing round; unsaved Schemas are lost on navigation.