How Do You Merge a Swiss QR-Bill onto a Base PDF in Zapier? A Seven-Step Dropbox Pattern.
Picture this: you already have a multi-page base PDF (your invoice layout, letterhead, whatever lives in demo_5_page.pdf). You also work from a Word file that you want turned into a proper Swiss QR-bill and stamped on top of that base. Copy-pasting PDFs between tools gets old fast.
Here is a Zap that does the boring work: Dropbox wakes up when something new lands, PDF4me converts your Word doc, builds the SwissQR slip, overlays it on the base file, and drops the finished PDF back in a folder you choose. The screenshots below use real paths and names from a test workspace (/pdf4metest/TestRP, 3Page.docx, and so on). Swap them for yours and you are set.
1. New file in Dropbox → 2. Find 3Page.docx → 3. Convert to PDF → 4. Create SwissQR Bill → 5. Find demo_5_page.pdf → 6. Merge PDF Overlay (base + QR layer) → 7. Upload mergeoverlay.pdf to /pdf4meoutput.
In Merge PDF Overlay, the base is the big invoice PDF from Dropbox (step 5). The layer is the Swiss QR-bill PDF from Create SwissQR Bill (step 4). If you flip them, the result looks nothing like what you expected. We have all done it once.
What you are actually building!
You end up with one PDF file: the payment slip (QR part) drawn on top of your existing layout. Word is not the final product here. It is the input you convert so Create SwissQR Bill has a PDF to work with, plus all the banking fields you fill in Zapier.
If your team lives in Switzerland or you bill Swiss clients with QR-bills, and you already use Dropbox, this pattern saves a lot of clicking. Same idea as the Power Automate version of the flow, just with Zaps and steps instead of actions.
At a glance: all seven steps
Why this stack?
Authors keep working in .docx. Convert to PDF hands a clean PDF to Create SwissQR Bill, which is what the action expects.
Merge PDF Overlay puts the QR-bill PDF on top of your base pages. Handy when the slip has to sit in a fixed spot on a template you already trust.
New file in folder, polling, and hooks into email or Slack later are all Zap territory. No deploy, no server.
Before you start (checklist!)
Zapier account plus Dropbox and PDF4me connected.
API key from the dashboard. New to this? Connect PDF4me to Zapier walks through it once.
- Folders you actually use: watch path, template path, base PDF path, output path.
- Real IBAN, reference (for example QRR), amounts, and addresses that your bank accepts. The screenshots use sample values; production data is on you.
The Zap at a Glance (Seven Steps!)
- Dropbox – New File in Folder — Example folder:
/pdf4metest/TestRP. Turn on Include file contents. - Dropbox – Find File — Picks up
3Page.docx(or your template). Include file contents: Yes. - PDF4me – Convert to PDF — Feed the file from step 2; map name and extension from the same step.
- PDF4me – Create SwissQR Bill — Map the converted PDF, then work through creditor, debtor, IBAN, reference, currency, and layout fields (Zapier splits this across several screens; see expandable section below).
- Dropbox – Find File — Example:
/Blog Data/Convert-SwissQR-Mergeand filedemo_5_page.pdf. - PDF4me – Merge PDF Overlay — Base = step 5, layer = SwissQR output from step 4.
- Dropbox – Upload File — Example:
/pdf4meoutput, filenamemergeoverlay.pdf. Turn on Include sharing link if something downstream needs a URL.
Flow overview
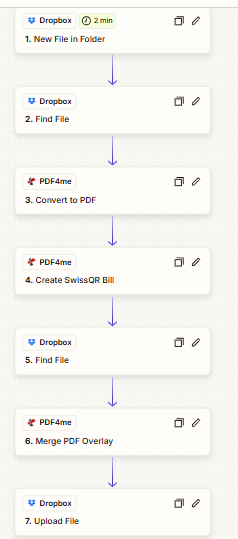
Every green checkmark is one less thing you will second-guess at three in the afternoon.
Step 1: New File in Folder (Trigger)
Zap so far: Trigger only.
Add Dropbox → New File in Folder and treat it as your gatekeeper.
- Use Folder to watch only the exact intake location (example:
/pdf4metest/TestRP), so random uploads elsewhere do not fire the Zap. - Keep Include file contents = Yes; without it, downstream PDF4me steps may receive metadata only.
- Turn Include sharing link on only if later automation needs a URL (email, CRM, ticketing, etc.).
- Why this matters: this step decides when automation runs. A loose folder selection creates noisy, expensive runs.
- Quick check before moving on: run a trigger test and confirm you can see file metadata plus binary/file-content fields in the sample output.
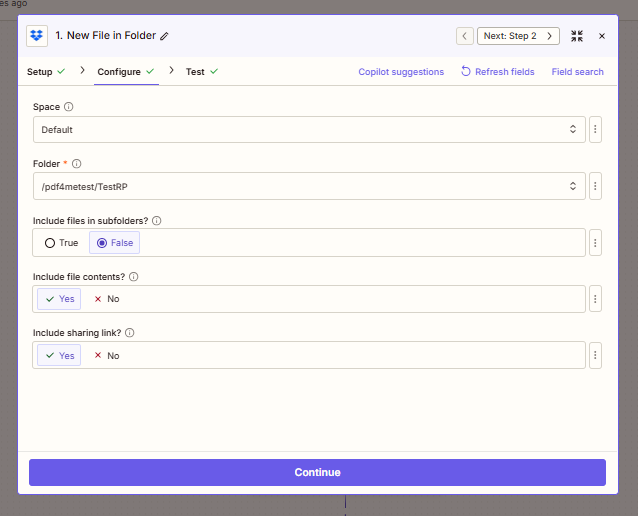
Step 1 screenshot: watch folder is set, and file contents are included so downstream steps can read the file.
Step 2: Find the Word Template
Zap so far: Trigger → Find File.
Use another Dropbox → Find File to fetch the template intentionally, not accidentally.
- Set the path and filename (example:
3Page.docx) so every run uses a known source document. - Keep Include file contents = Yes again, because step 3 needs actual file bytes.
- This pattern decouples trigger noise from template logic: trigger file can vary, template file stays controlled.
- Why this matters: in production, trigger files can have unexpected names. This step keeps your template deterministic.
- Common miss: picking the wrong folder level and returning multiple matches. If needed, tighten file naming or folder structure.
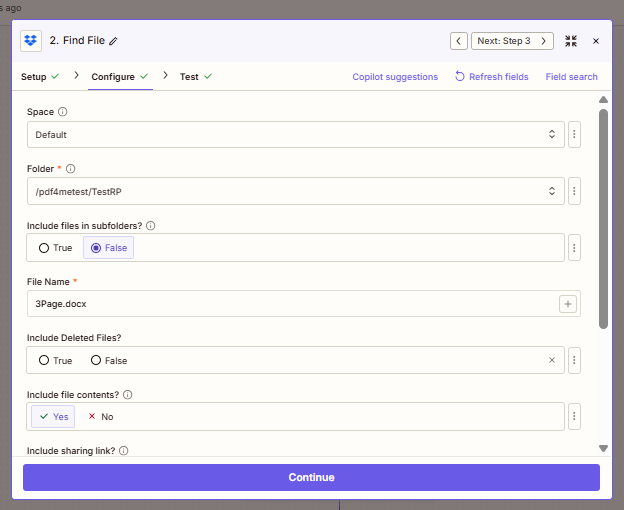
Step 2 screenshot: Zapier finds the exact Word template (3Page.docx) and returns file content for conversion.
Step 3: Convert to PDF
Zap so far: Trigger → Find Word → Convert to PDF.
Configure PDF4me → Convert to PDF so the SwissQR action gets a clean PDF input.
- Map File from step 2 (the Word template output), not from the trigger.
- If Zapier shows “Exists but not shown,” that is usually fine: binary is mapped even when preview is hidden.
- Map File Name from 2. File Name + 2. File Extension to preserve source naming and reduce confusion in logs.
- Why this matters: Create SwissQR Bill works on PDF input. This is the format bridge between authoring (
.docx) and billing output. - Quick check before moving on: test this step and verify the output MIME/file extension is PDF.
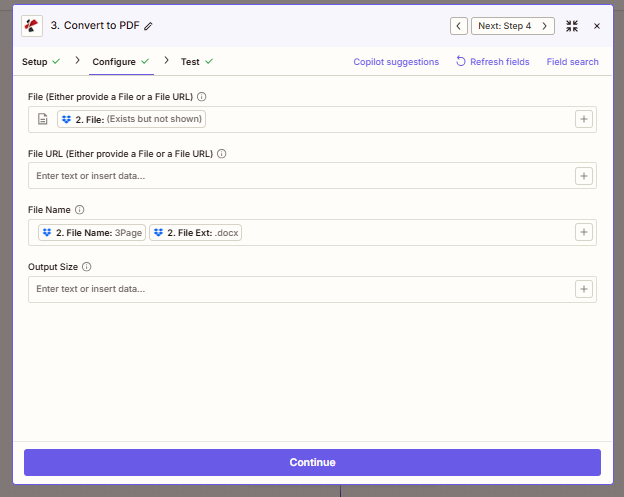
Step 3 screenshot: the Word file from Step 2 is mapped into Convert to PDF to generate a clean PDF for SwissQR.
Step 4: Create SwissQR Bill
Zap so far: Through step 3.
Add PDF4me → Create SwissQR Bill (named Create SwissQR in docs) and fill it carefully.
- Map the converted PDF from step 3 into File/File URL and keep file-name fields aligned.
- Fill all payment-critical fields: creditor details, IBAN, reference type (e.g., QRR), amount, currency, debtor fields, and message.
- Run this step once before wiring overlay. It is faster to catch validation issues here than after step 6.
- Why this matters: this is where legal/payment correctness lives. One wrong field can generate an unusable slip.
- Practical tip: keep a known-good bank-approved sample nearby and compare IBAN/reference/address formatting field-by-field.
Create SwissQR Bill screenshots (5 panels)
Scroll through in order; they match how Zapier breaks the form into chunks.
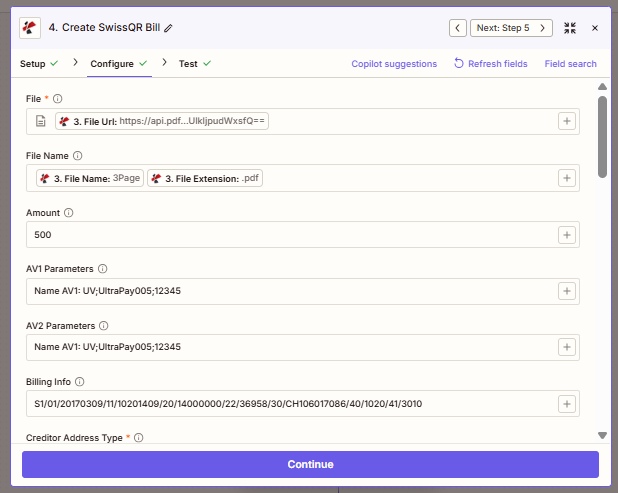
Panel 1: file mapping, amount, and billing parameters.
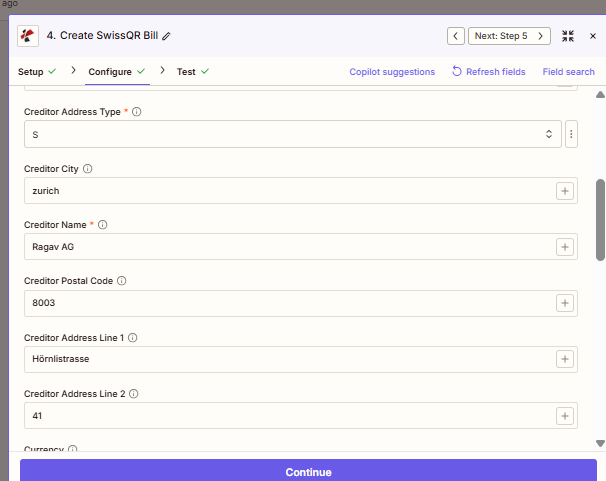
Panel 2: creditor details (name and address block).
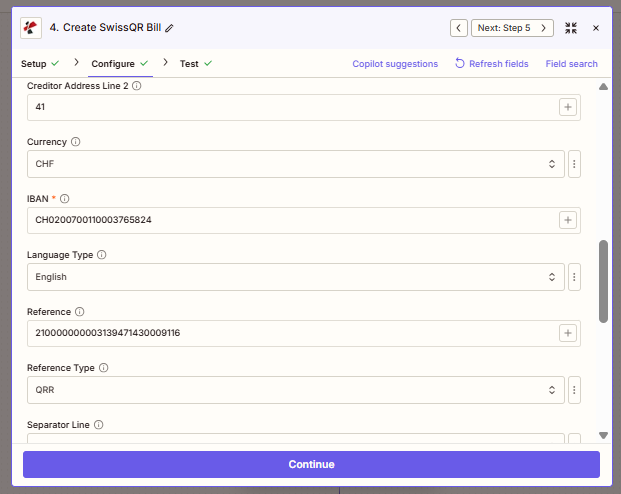
Panel 3: payment essentials like IBAN, currency, language, and reference type.
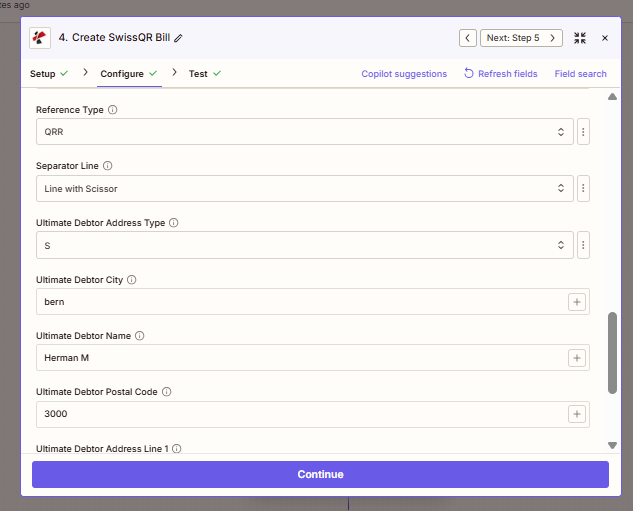
Panel 4: layout options plus debtor address format.
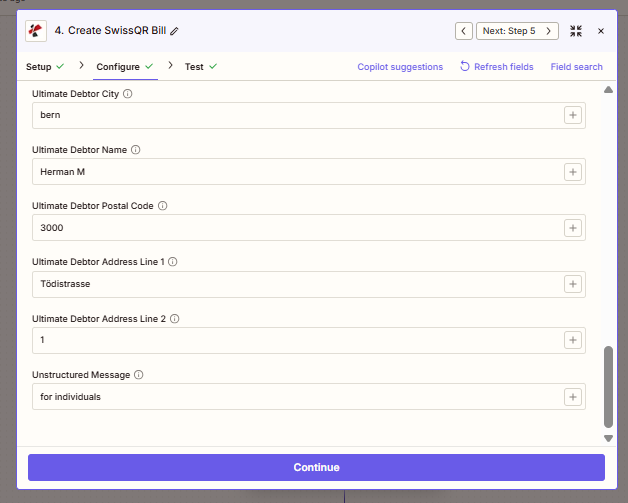
Panel 5: debtor address completion and unstructured message.
Step 5: Find the Base PDF
Zap so far: Through Create SwissQR.
Find the existing invoice layout that should receive the QR layer.
- Use Dropbox → Find File with your base path (example:
/Blog Data/Convert-SwissQR-Merge) and base filename (demo_5_page.pdf). - Keep Include file contents = Yes so Merge Overlay receives the actual PDF, not just metadata.
- Think of this as your “canvas” file; step 4 is the “sticker” file.
- Why this matters: the base file controls final page geometry and branding. Wrong base = wrong final document.
- Quick check before moving on: confirm the retrieved file is the expected template version (especially if teams replace files in-place).
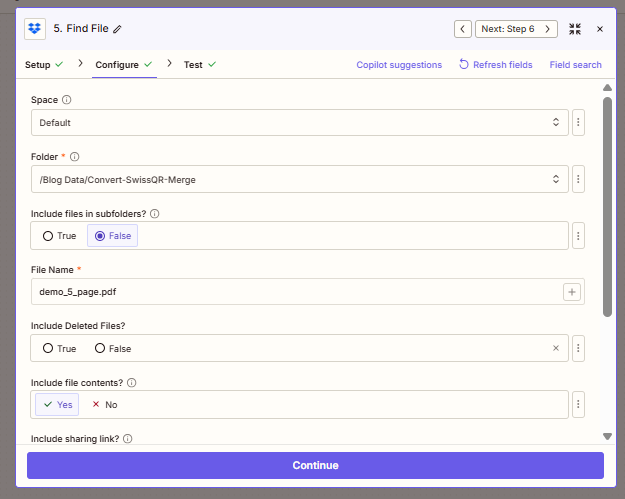
Step 5 screenshot: this is the base invoice/template PDF that will receive the SwissQR layer.
Advanced Find options (multiple results, empty folder)
If you rely on “first match” or you need the Zap to fail loudly when the PDF is missing, these toggles matter. Match what your ops team expects.
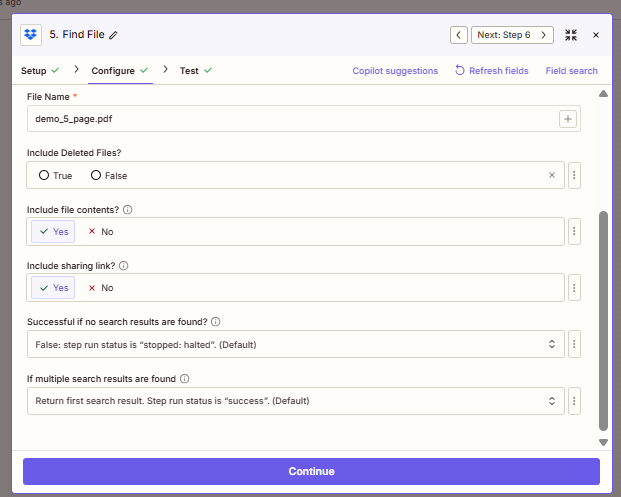
Advanced options screenshot: tune how Zapier behaves when files are missing or multiple matches are found.
Step 6: Merge PDF Overlay
Zap so far: Base PDF and SwissQR PDF both available.
This is the critical composition step, so map fields deliberately.
- File (base) must come from step 5 (your base invoice PDF).
- Layer File must come from step 4 (the SwissQR output PDF URL/file).
- Use Layer File Name from step 4 (example:
3Page.pdf) to avoid mismatched layer metadata. - Why this matters: overlay order defines the visual result. Reversed mapping can hide the QR area or produce a blank-looking page.
- Quick check before moving on: run a test and open page 1 and last page; verify the QR-bill appears at the intended position.
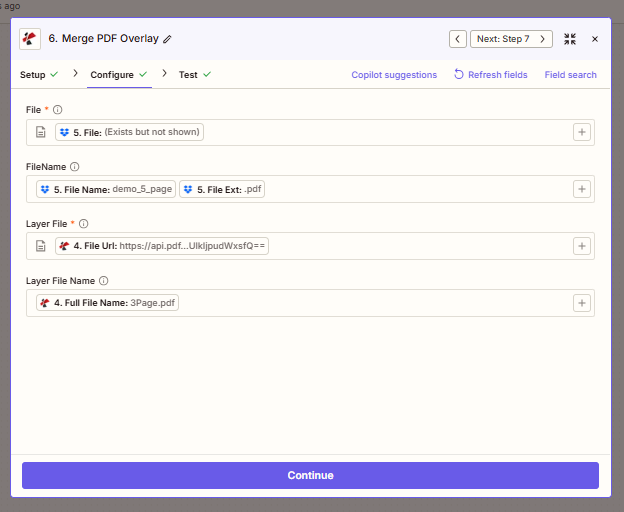
Step 6 screenshot: base PDF comes from Step 5, and SwissQR output from Step 4 is mapped as the overlay layer.
Step 7: Upload File
Zap so far: Full Zap.
Publish the final merged document so people (or systems) can actually use it.
- Upload to the target folder (example:
/pdf4meoutput) and map File from step 6. - Set Specify File Name + Extension explicitly (example:
mergeoverlay+pdf) for predictable output naming. - Enable Include sharing link = Yes only when downstream steps need a URL payload.
- Why this matters: consistent naming/pathing is what makes handoff, audits, and downstream automations reliable.
- Practical tip: add timestamp or invoice ID to the file name once the flow is stable to avoid accidental overwrites.
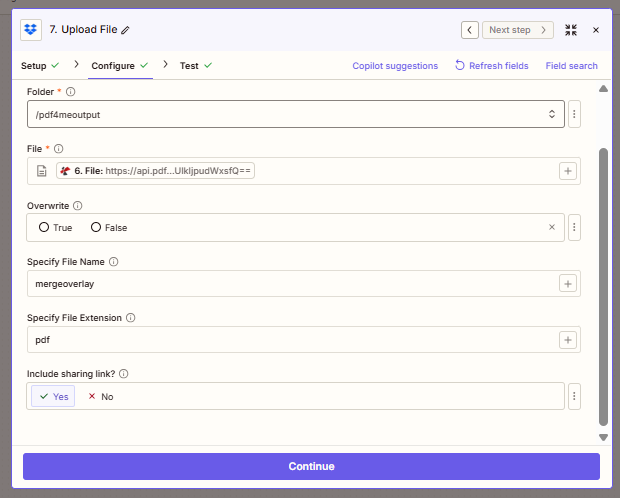
Step 7 screenshot: final merged PDF is uploaded to the output folder with your chosen filename.
Quick Reference
| # | Step | Job |
|---|---|---|
| 1 | New File in Folder | Wake the Zap |
| 2 | Find File | Grab the Word template |
| 3 | Convert to PDF | PDF for SwissQR input |
| 4 | Create SwissQR Bill | Build the QR-bill PDF (layer) |
| 5 | Find File | Load the base PDF |
| 6 | Merge PDF Overlay | Stack layer on base |
| 7 | Upload File | Save final PDF |
Deeper field lists: Create SwissQR Bill, Merge PDF Overlay, Convert to PDF.
Troubleshooting
Nine times out of ten it is IBAN format, reference length for QRR, or address type S versus K. Compare what you typed with a working slip from your bank portal.
Swap check: base from step 5, layer from step 4. If the QR page is full-bleed white, you might have merged two layers in the wrong order.
PDF4me Troubleshooting covers API keys, credits, and reconnecting the integration.
What to try next
Optional: add a Filter right after the trigger so only .docx (or a name prefix) runs the heavy steps. Your task history stays cleaner.