SharePoint List to Filled and Signed PDF in Power Automate !!

Fill a PDF Form is a Power Automate action that takes a fillable PDF template plus a JSON payload and returns the same PDF with every field pre-populated. Add PDF - Sign and a SharePoint When an item is created trigger and the whole invoice-generation flow becomes hands-free: a colleague adds a row, Power Automate builds the signed PDF, and Dropbox stores it under a timestamped filename.
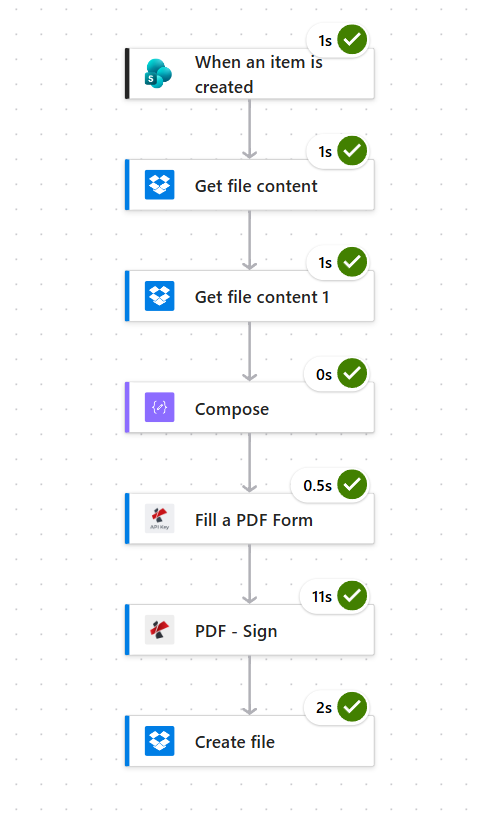
The painful part of invoice-style workflows is not the PDF, it is the manual step in the middle. Someone opens the template, retypes eight fields from a spreadsheet row, prints, signs, scans back, uploads. Every field is a chance to typo the customer name or drop a zero from the amount. This walkthrough replaces that ritual with seven Power Automate actions: SharePoint fires the trigger, Dropbox supplies the template plus the signature image, PDF4me fills the form and stamps the signature, Dropbox stores the finished file. Real screenshots, exact Compose expression, the SharePoint schema, and the sample signed invoice all downloadable.
SharePoint list trigger fires on every new invoice row. Dropbox supplies the fillable PDF template plus a PNG signature. Compose builds a JSON payload from the row. PDF4me Fill a PDF Form merges data into the template. PDF4me PDF - Sign stamps the signature. Dropbox saves the signed file with a timestamped, invoice-numbered filename.
Why every part of this flow is deliberate
What you will get
One Power Automate flow that watches a SharePoint list, and for every new row produces a filled, signed PDF invoice named Signed_INV-YYYY-NNN_<ticks>.pdf in your Dropbox output folder. The signature stamp lands in the bottom-right corner of page 1. The rest of the template is preserved exactly as your designer built it.
What you need
- SharePoint site with a list called
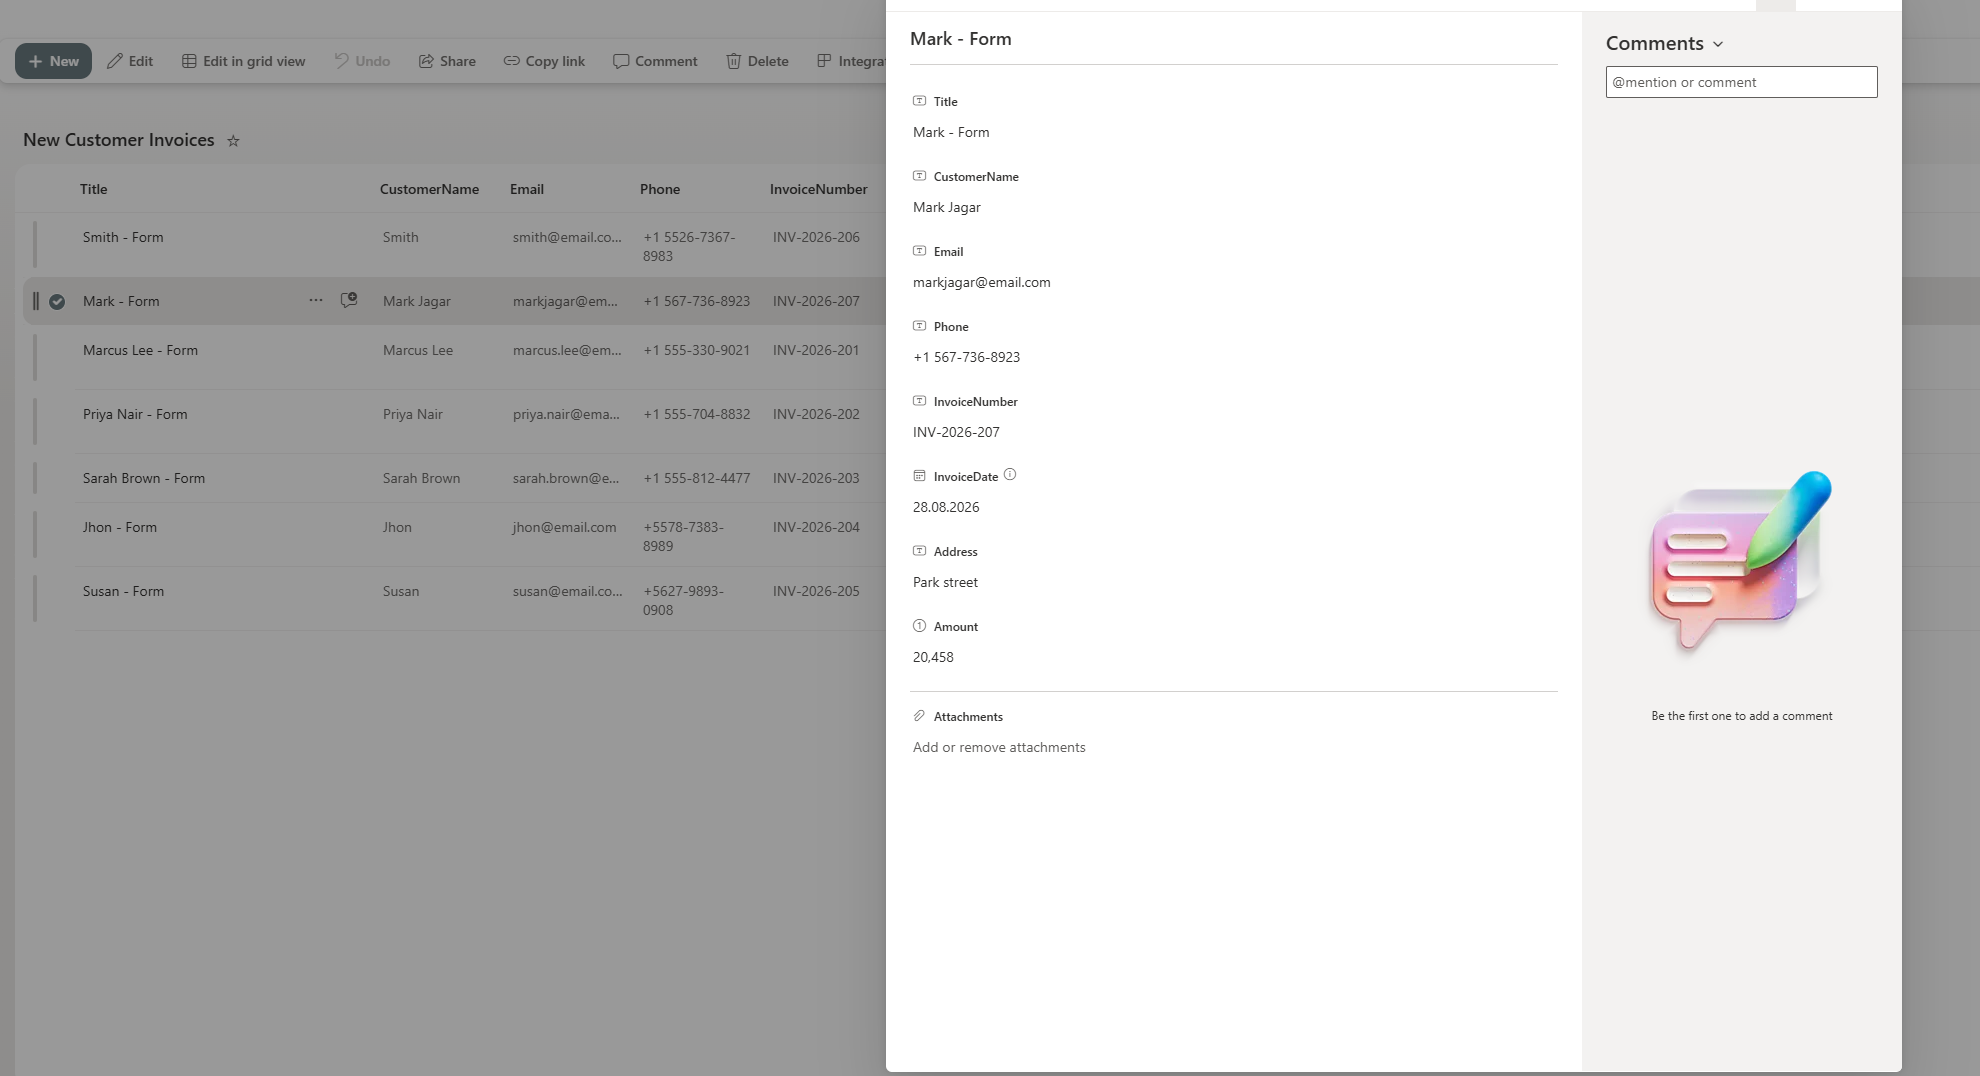
New Customer Invoices(or renamed to match yours) carrying these columns:Title,CustomerName,Email,Phone(all Single line of text)InvoiceNumber(Single line of text, e.g.INV-2026-207)InvoiceDate(Date),Address(Single line of text),Amount(Number)
- PDF template with named form fields matching the JSON keys (
customerName,email,phone,invoiceNumber,invoiceDate,address,amount). - A PNG signature with a transparent background.
- PDF4me connection in Power Automate. Get your API key if this is your first flow.
- Dropbox connection in Power Automate (SharePoint / OneDrive / any other storage substitutes cleanly).
The flow at a glance
Seven Power Automate actions, sequential. No parallel branches, no Apply to each, no variables. Every step's output feeds directly into the next.
The SharePoint list itself is the contract. Every row that lands here becomes one signed PDF.
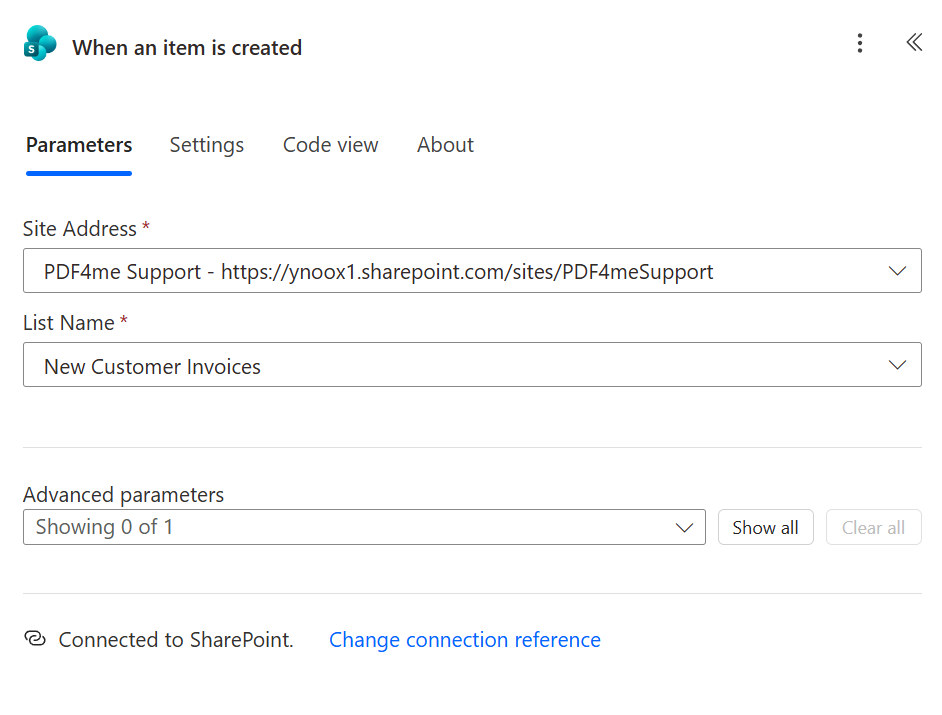
How do you trigger the flow when a SharePoint row is added?
Flow so far: trigger only.
- Add a new Automated cloud flow. Search SharePoint and pick When an item is created.
- Set Site Address to your SharePoint site (in the screenshot:
PDF4me Supportathttps://ynoox1.sharepoint.com/sites/PDF4meSupport). - Set List Name to
New Customer Invoices. - Leave Advanced parameters at their defaults. The trigger fires the moment a row is added, no polling schedule to tune.
Tip. Rename the list columns in SharePoint to match the PDF field names (
customerName,
How do you pass the PDF template and signature into the flow?
Flow so far: trigger → Get file content → Get file content 1.
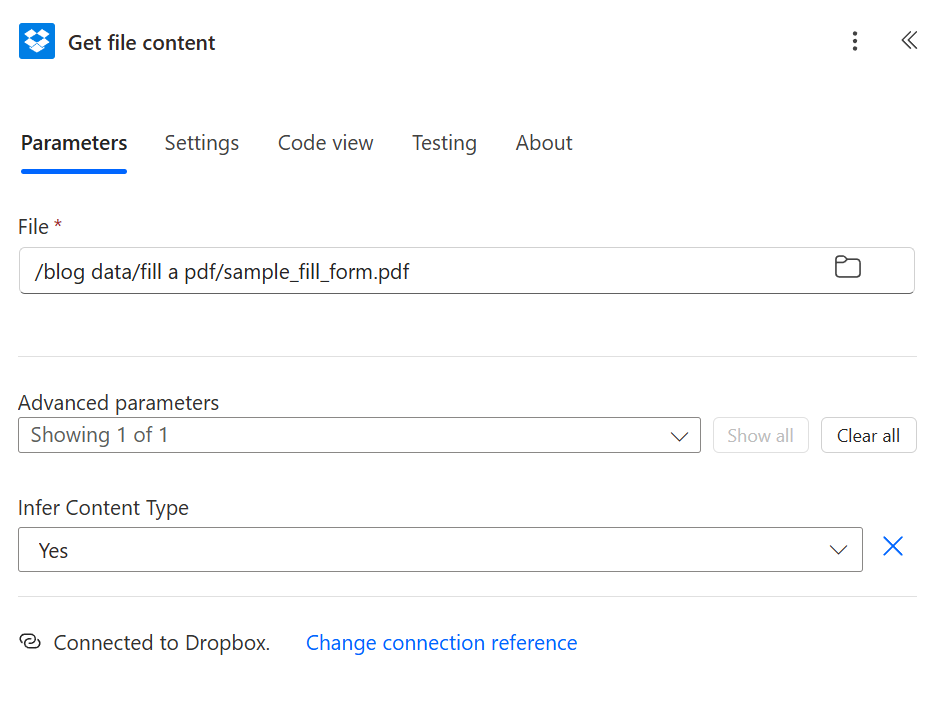
Two Dropbox reads, one for the PDF template, one for the signature PNG. Both live in the same folder so the flow author does not hunt for them later.
- Add Dropbox - Get file content using path. File:
/blog data/fill a pdf/sample_fill_form.pdf. - Under Advanced parameters, set Infer Content Type to Yes. Without this the PDF binary can be mangled during transport.
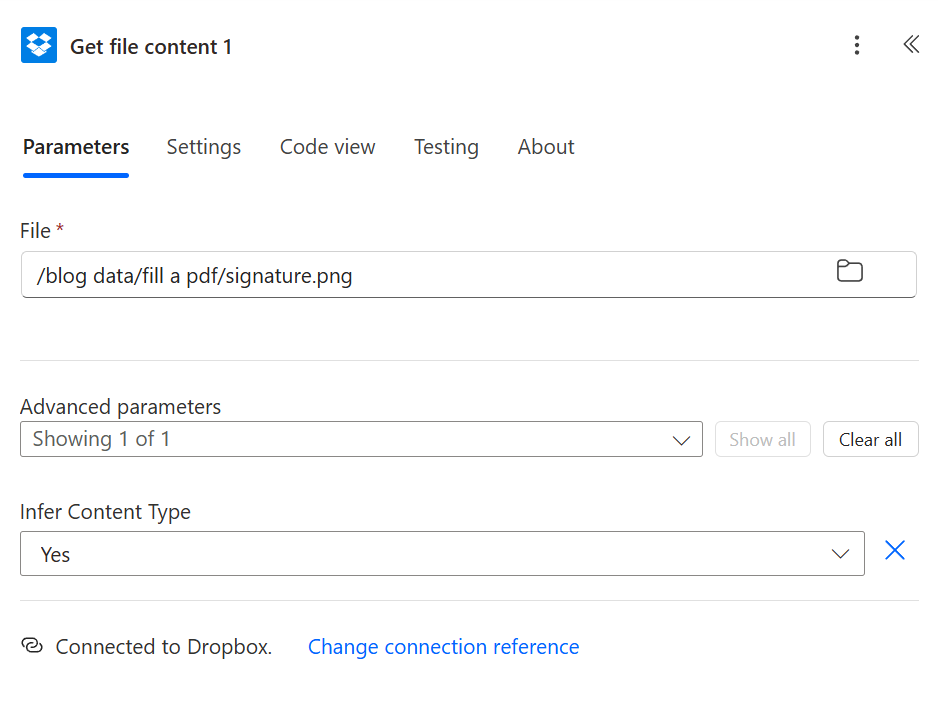
- Add a second Dropbox - Get file content using path. This is where Power Automate auto-renames it to
Get file content 1. - File:
/blog data/fill a pdf/signature.png. - Same Infer Content Type Yes toggle.
How do you build the JSON payload from the SharePoint row?
Flow so far: trigger → Get template → Get signature → Compose.
Compose is the "assemble JSON" step. It takes trigger fields (dynamic content) and drops them into one JSON object that PDF4me Fill a PDF Form understands.
- Add Compose.
- Click Inputs, paste the JSON skeleton below, then replace each right-side value with the matching SharePoint column from the dynamic content picker (so each pill sits between the quotes):
{
  "customerName": "CustomerName",
  "email": "Email",
  "phone": "Phone",
  "invoiceNumber": "InvoiceNumber",
  "invoiceDate": "InvoiceDate",
  "address": "Address",
  "amount": "Amount"
}
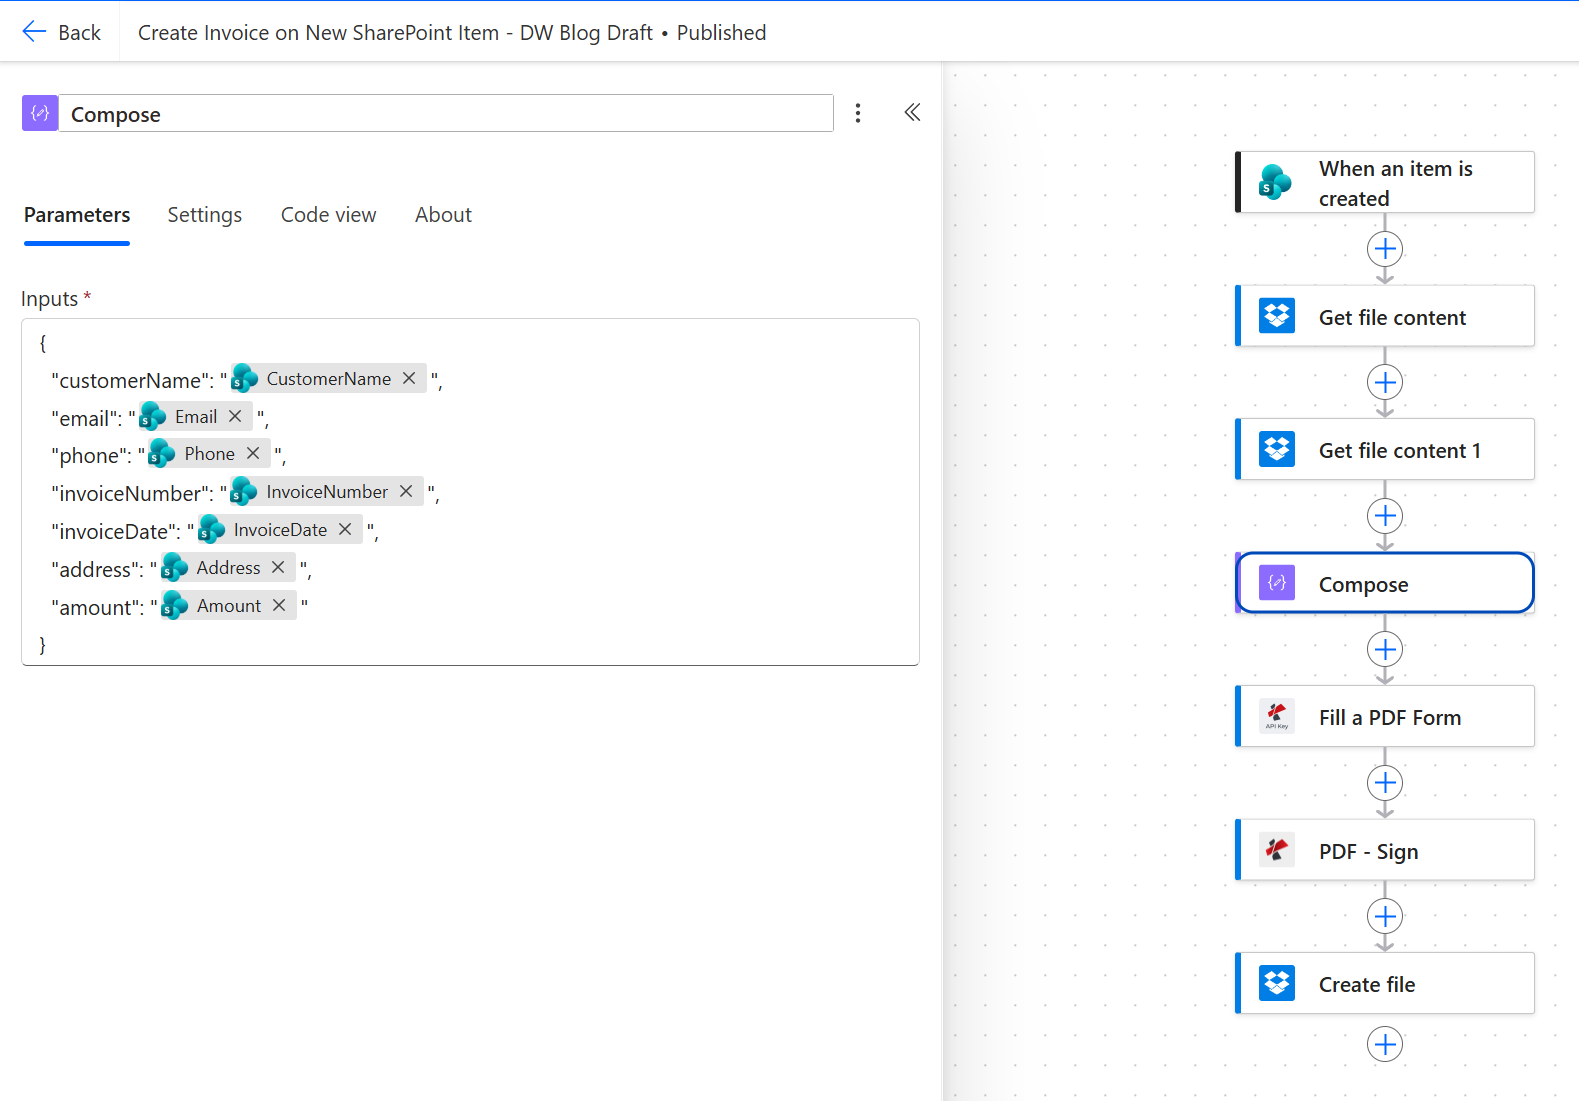
Reference table for the payload:
| JSON key | Source (SharePoint column) | Type | Notes |
|---|---|---|---|
customerName | CustomerName | Text | Mapped directly. |
email | Email | Text | Any string, no format check at this step. |
phone | Phone | Text | Kept as text. Do not coerce to Number, phone extensions and hyphens matter. |
invoiceNumber | InvoiceNumber | Text | Also reused in the output filename. |
invoiceDate | InvoiceDate | Date | Pill sits inside quotes, so Compose emits it as text, not an ISO Date object. |
address | Address | Text | Single-line. |
amount | Amount | Number | Pill sits inside quotes, so JSON receives a quoted value. |
Tip. Always drop the dynamic-content pill between the two quotes of each JSON value. A pill placed outside the quotes emits a raw number or date, and an unquoted number followed by a
,mid-string breaks the payload silently.
How do you fill the PDF form with the JSON data?
Flow so far: trigger → Get template → Get signature → Compose → Fill a PDF Form.
This is the first PDF4me action. It takes the template PDF and the JSON payload and writes each JSON value into the matching form field by name.
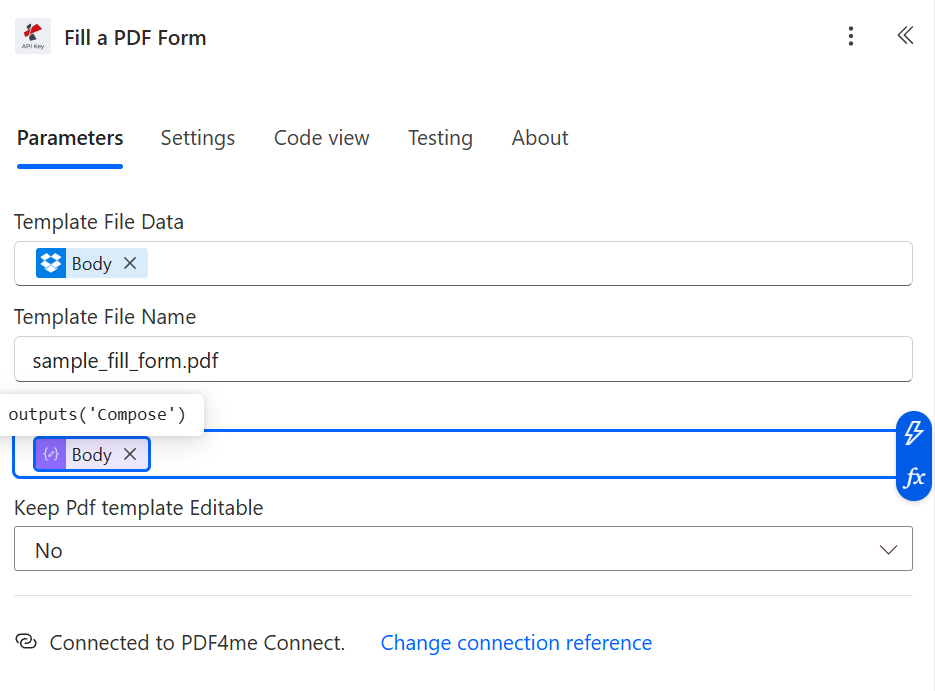
- Add PDF4me PDF connector, action Fill a PDF Form.
- Template File Data: dynamic content, Get file content → File Content (the template PDF binary).
- Template File Name:
sample_fill_form.pdf(or whatever the file is called). - JSON Data: dynamic content, Outputs from the Compose step.
- Keep PDF template Editable: No (this flattens the form after filling, so the recipient cannot un-fill the fields).
Tip. If you want the recipient to be able to edit specific fields later (e.g. add a memo), flip Keep PDF template Editable to Yes. The filled values are still there. Only the field lock changes.
How do you add the signature stamp with PDF - Sign?
Flow so far: trigger → Get template → Get signature → Compose → Fill a PDF Form → PDF - Sign.
PDF - Sign overlays your signature PNG on the filled PDF, at a fixed position, at whatever opacity you choose.
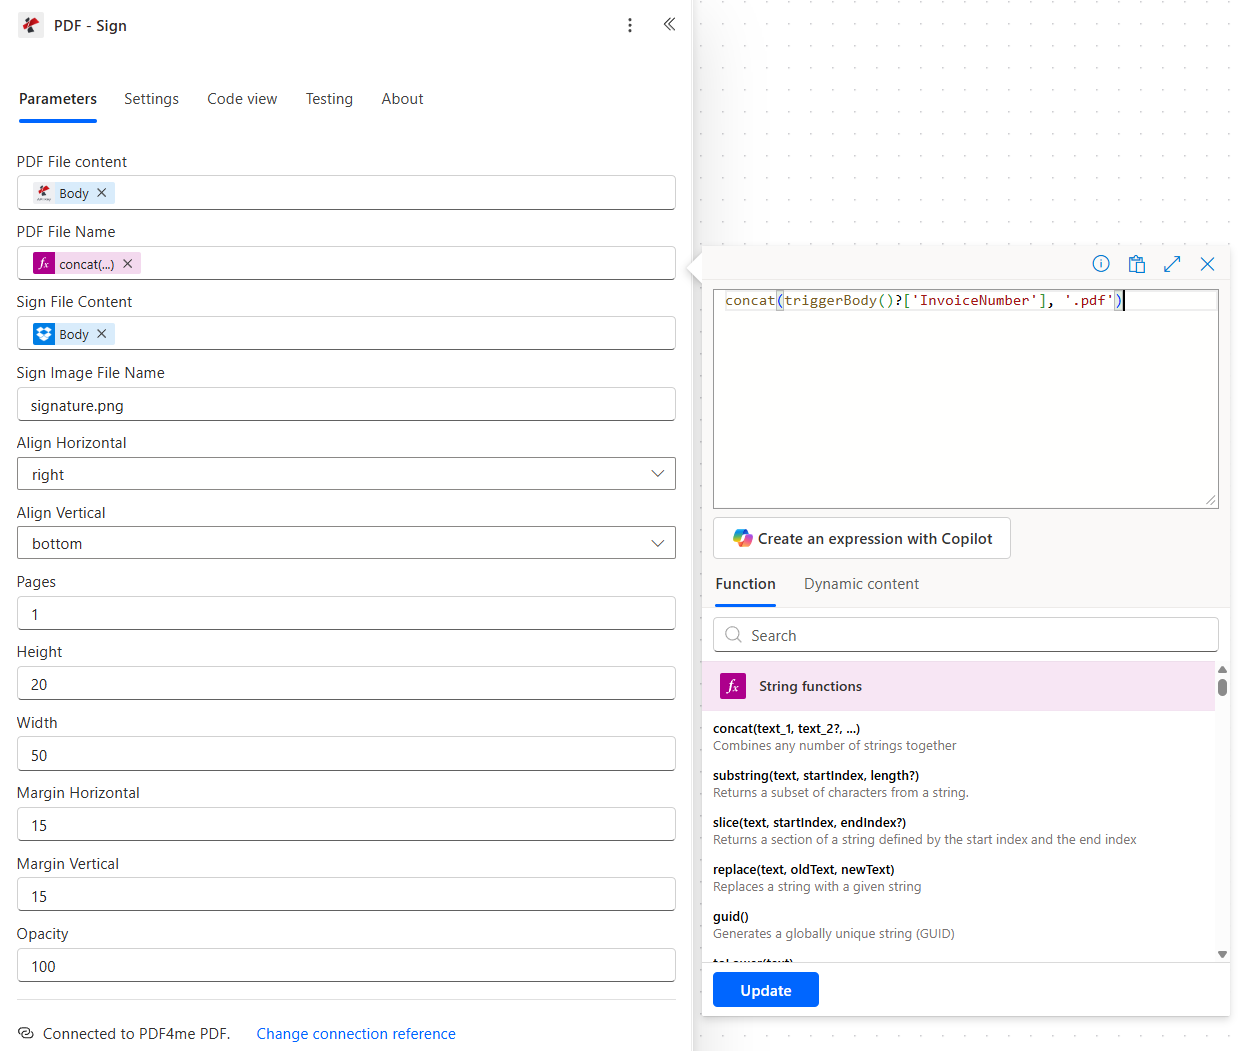
- Add PDF4me PDF connector, action PDF - Sign.
- PDF File content: dynamic content, Fill a PDF Form → Body (the filled PDF binary).
- PDF File Name: expression
concat(triggerBody()?['InvoiceNumber'], '.pdf'), which names the fileINV-2026-207.pdfso downstream logs show the invoice number. - Sign File Content: dynamic content, Get file content 1 → Body (the signature PNG).
- Sign Image File Name:
signature.png. - Align Horizontal: right. Align Vertical: bottom.
- Pages:
1(page 1 only, set to1,3for pages 1 and 3, or leave blank for every page). - Height:
20. Width:50. Margin Horizontal:15. Margin Vertical:15. Opacity:100.
Position reference:
| Field | What it controls | Example |
|---|---|---|
| Align Horizontal | Which side of the page | left, center, right |
| Align Vertical | Top / middle / bottom band | top, center, bottom |
| Pages | Which page numbers get the stamp | 1 (first only), 1,3 (first and third), empty (every page) |
| Height / Width | Signature box size in PDF units | Match to your signature.png aspect ratio, else it stretches |
| Margin Horizontal / Vertical | Gap from the aligned edge | 15 = 15 units in from the right edge (given Align right) |
| Opacity | 0 to 100 | 100 = fully opaque; 70 for a watermark-like feel |
How do you save the signed PDF back to Dropbox?
Flow so far: trigger → Get template → Get signature → Compose → Fill a PDF Form → PDF - Sign → Create file.
Last step. The finished PDF goes to a dedicated output folder with a filename that guarantees no two runs collide.
- Add Dropbox - Create file.
- Folder Path:
/blog data/fill a pdf/output. - File Name: expression
concat('Signed_', string(triggerBody()?['InvoiceNumber']), '_', string(ticks(utcNow())), '.pdf'), produces names likeSigned_INV-2026-207_639235162128009339.pdf. - File Content: dynamic content, PDF - Sign → Body (the signed PDF binary).
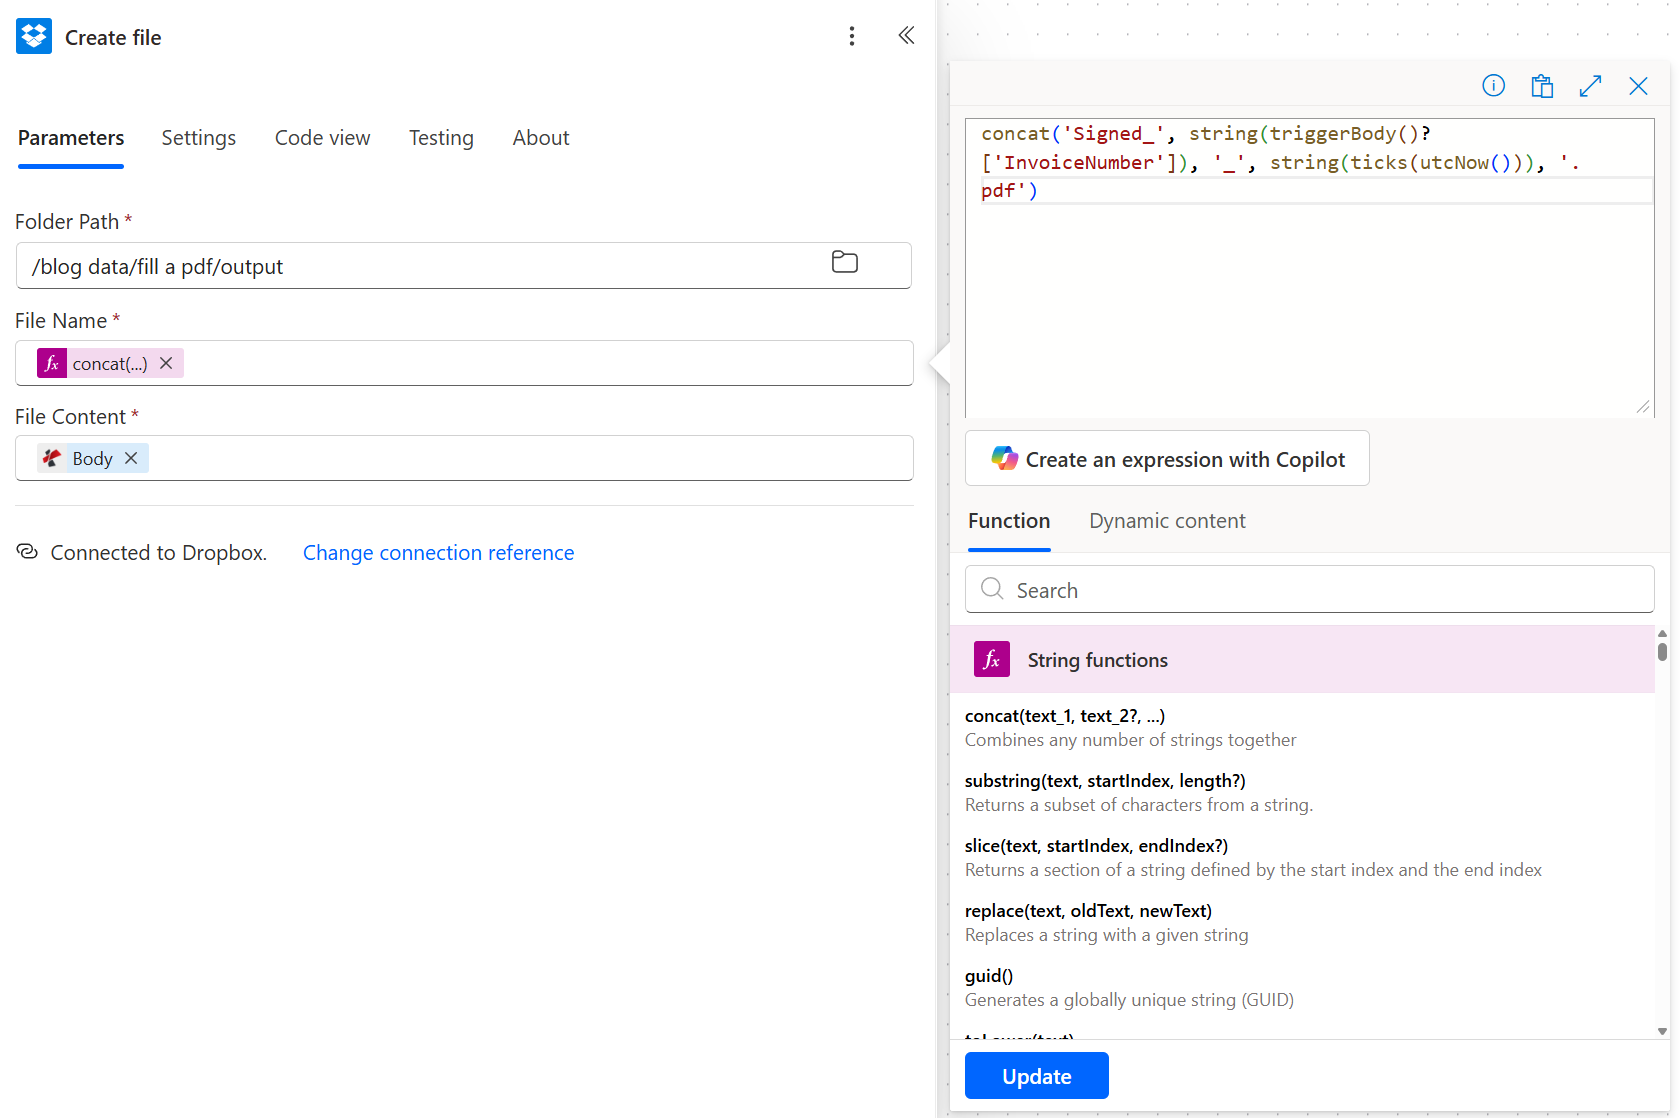
Tip. Swap Dropbox for SharePoint - Create file or OneDrive - Create file without touching any other step. The PDF binary is the same; only the storage adapter changes.
Run the flow and verify what you got
/blog data/fill a pdf/output gets Signed_INV-2026-207_639235162128009339.pdf. Open it: the eight fields are filled, and the signature sits bottom-right of page 1. That is the sample linked at the top of this post.Common variations you can add without rebuilding
Common questions
How to fill PDF forms using Power Automate?
Add the PDF4me Fill a PDF Form action after a step that reads your PDF template (Dropbox / SharePoint / OneDrive Get file content) and a Compose step that builds a JSON payload from your trigger fields. Map Template File Data to the PDF binary and JSON Data to the Compose output. The JSON keys must match the form field names in the template exactly.
Can Power Automate fill out a PDF form?
Yes, in one connector action once you install a PDF connector. Native Power Automate cannot write into a fillable PDF on its own, but the PDF4me Fill a PDF Form action does the whole fill-and-flatten in a single step, driven by a JSON payload you build with Compose or from a SharePoint / Excel row.
How to auto fill PDF form fields?
Trigger on the data source (SharePoint list, Excel row, form submission), build a JSON object whose keys match the PDF field names, then pass the JSON plus the template PDF to PDF4me Fill a PDF Form. The action returns the same PDF with every named field populated. Set Keep PDF template Editable to No to lock the values so recipients cannot un-fill them.
How to create a PDF using Power Automate from a SharePoint list item?
Use When an item is created as the trigger, then a Get file content step to load your PDF template, a Compose step to turn the row into JSON, and PDF4me Fill a PDF Form to merge them. The output is a filled PDF you can email, upload to SharePoint / OneDrive / Dropbox, or route to an approval flow. This blog builds exactly that pattern with a signature stamp on top.
How to auto sign PDF in Power Automate?
Add PDF4me PDF - Sign after any step that produces a PDF binary. Map PDF File content to the filled PDF, map Sign File Content to a PNG signature, and set the alignment (right / bottom), size (Height / Width), margins, and opacity. PDF - Sign stamps the image onto the pages you list. Leave Pages blank to sign every page.
Troubleshooting
Next steps
The pattern above is the shortest hands-free path from a SharePoint row to a signed, stored PDF, and the two PDF4me actions in the middle are the only pieces you cannot buy from Microsoft directly.
References
- SharePoint When an item is created trigger reference on Microsoft Learn
- Power Automate Compose action and expression functions on Microsoft Learn
- PDF form field naming guide on Adobe Acrobat Help
- Dropbox Create file connector on Microsoft Learn